DIYMobileAudio.com Car Stereo Forum banner

Unique System & Installation - 8th Gen. Civic EX Coupe

1 reading
37K views 53 replies 22 participants last post by  HardCoreDore  
#1 · (Edited)
NOTE: 25 photo 3 PAGE SUMMARY OF 5 YEARS OF WORK, PLAY AND TINKERING!

It's finally what I'll call done! Years of work (all by my rookie hands!) - thousands of dollars invested & hundreds of products tested in the process. Although the end result isn't as perfect as the many great installations here, I'm quite proud of the result.

I'm posting this now because unemployment has me close to selling things off, so this is my way of documenting the work and preserving the memories... and hopefully inspiring some of the people who've inspired me along the way! The pics over the next 3 pages show the end results, skipping all the things I've tried along the way - including:


  • Head Unitless Digital Audio and even HD video using up to 500gb HDD portable media players although I also tried several top h/u systems: W200/h701, DRZ9255, P880, Audison Bit One and more

  • 40ish drivers: Woofers - Morel 9, Focal Utopia, Rainbow Plat & more - Mids - Scan 12ms - Tweeters - Hiquphon OW1f, Scan Air Circ, Illuminators, old F-1 - Subs: ID Max and JBL GTI 12"

  • Many custom speaker mounts: Custom fiberglass pods, Wooden baffles to house 9" door drivers, Apillar mounts, MDF/Glass/Sand fiberglass composite sub enclosures

  • Various battery/wiring options: Big 3, Relay boards, Dual battery and more

Here is how its ended up...

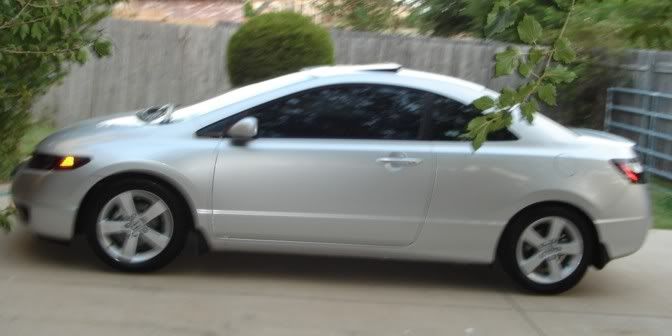
THE SUBJECT: CIVIC COUPE EX - 2006
Image


DAMPING/DEADENING
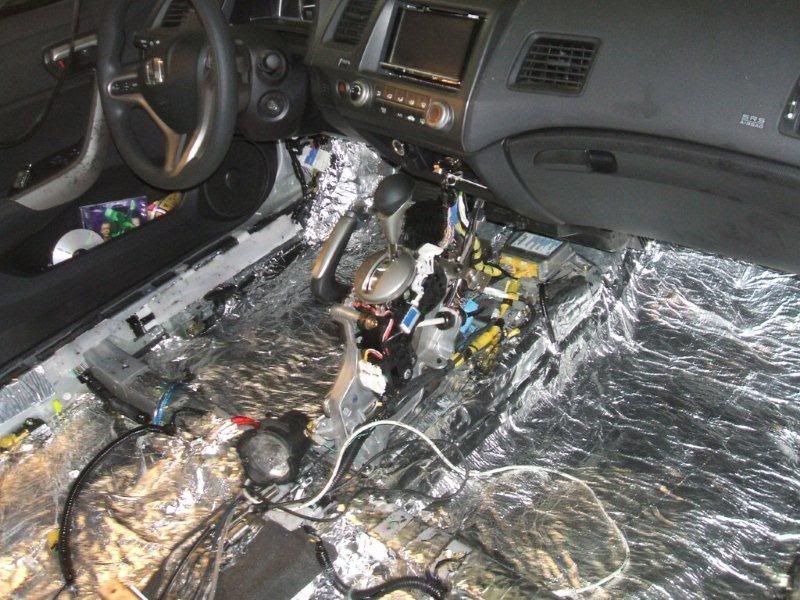
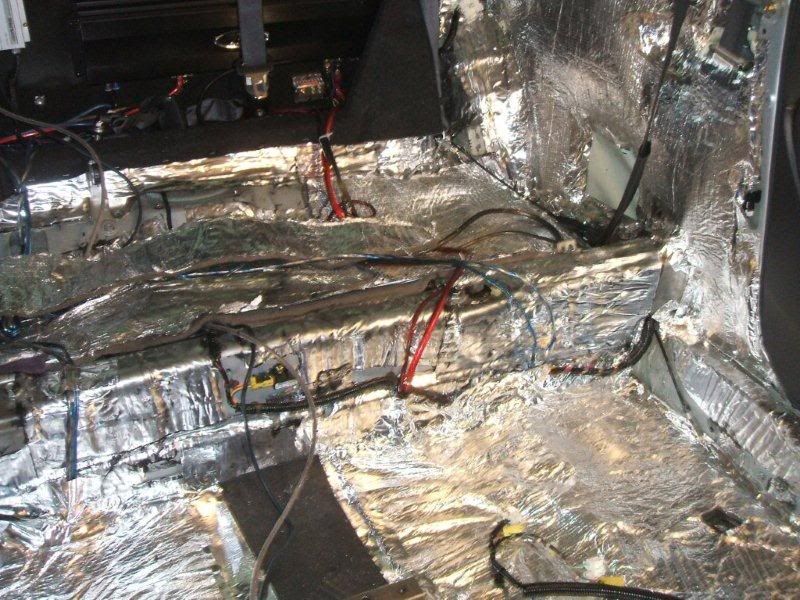
CABIN FLOOR/FIREWALL: Main cabin has 2-3 layers of Raammat BXT - covered by: 1 layer of ensolite and 1 layer of 3/8" RV soundproofing (not pictured). I did most of this before some of the new superior damping methods became available - but the overall level or road noise has decreased an AMAZING amount regardless!
Image

Image


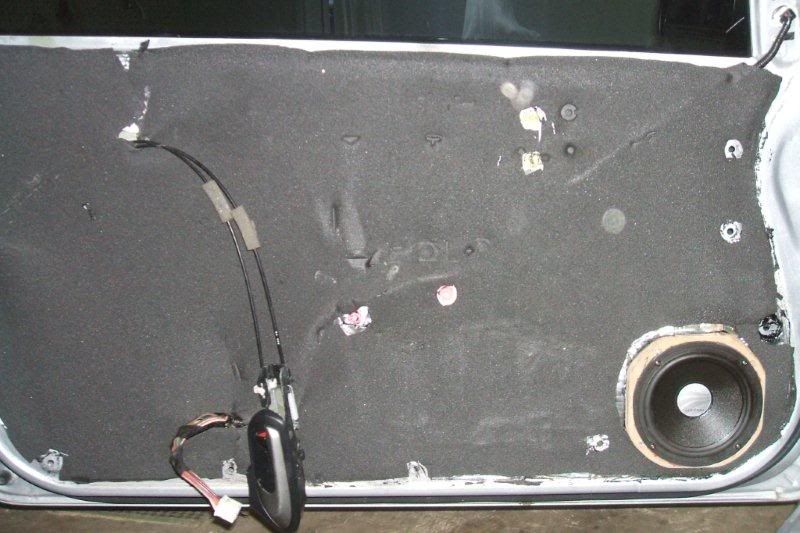
DOORS: The door was sealed with a plexiglass panel and silicone - 1-2 layers Dynamat (Supreme?), 2-3 layers of ensolite (note: I'll replace this with a current shot - this one is not final)

Image


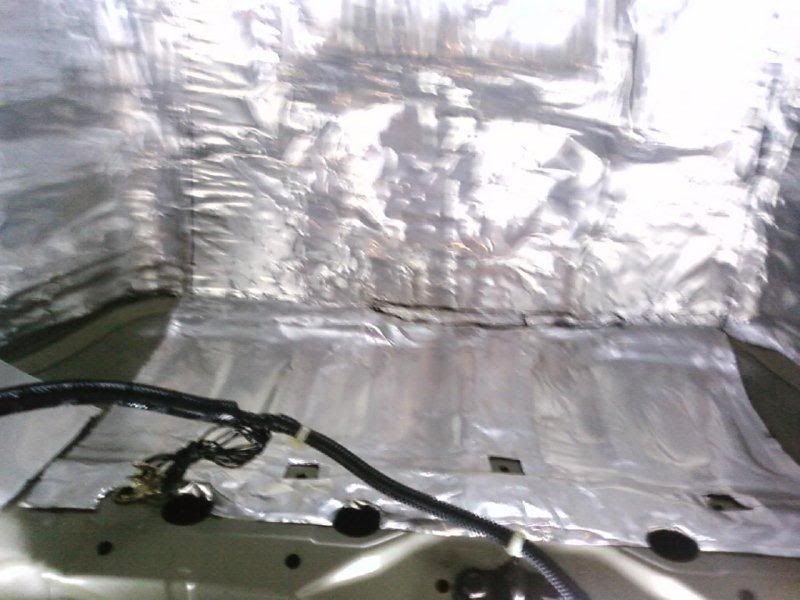
TRUNK: I was fortunate enough to win a trunk pack of Second Skin's Damplifier Pro through DIYMA - and its the real McCoy.
Image


CONSTRUCTION

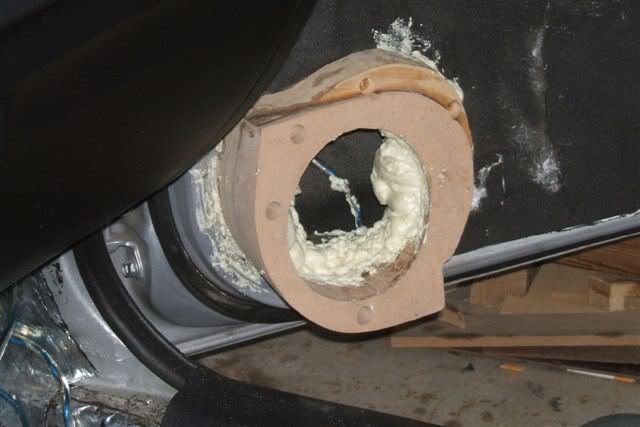
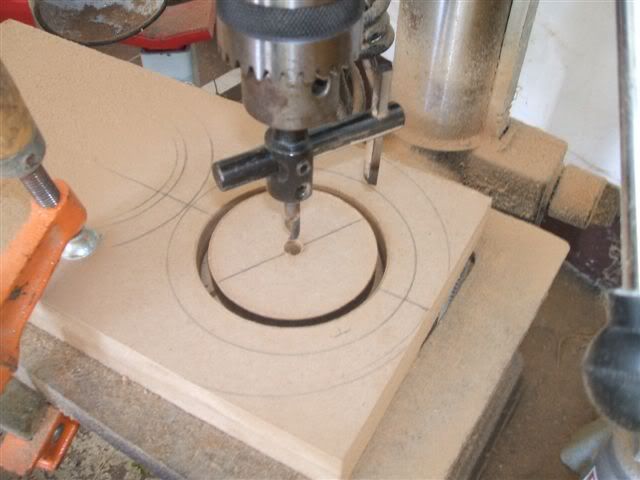
SPEAKER MOUNTS: MIDBASS - The civic baffle has the driver buried 3" behind a barely perforated thick plastic baffle & couldn't accommodate the 9"ish Morel MW 265 I wanted to use... so I changed it up a bit! Cut from 6 - 3/4 layers of MDF, and angled slightly back and up, these heavy buggers are bolted in 6 spots and sealed to the door using raammat material. Large gaps were filled with spray foam and each piece was coated with fiberglass resin for durability. Topped with upholstrey fabric, the outer baffle is a single 3/4" sheet seperately bolted with 6 t-nuts to allow for easy removal and driver change/replacement. (A big project to perfect)
Image


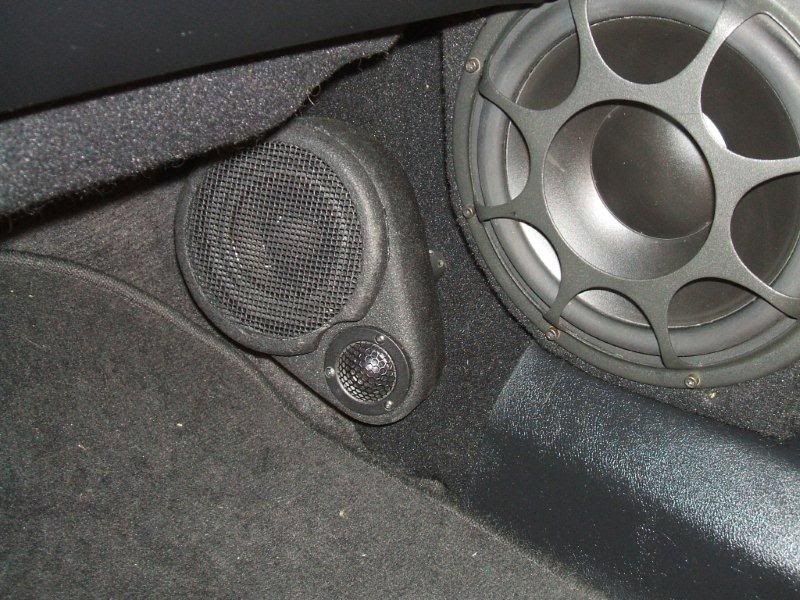
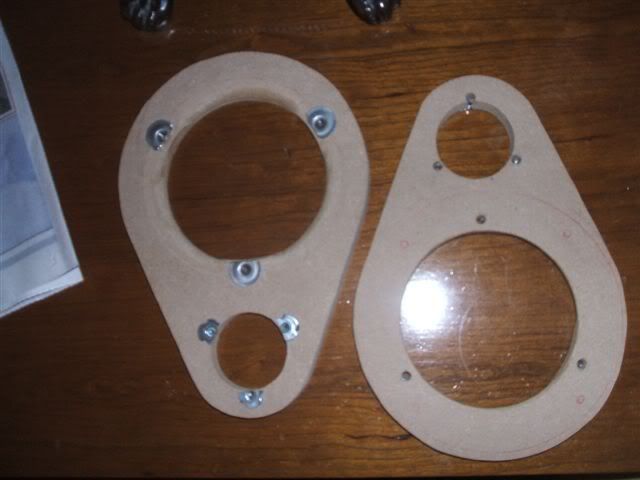
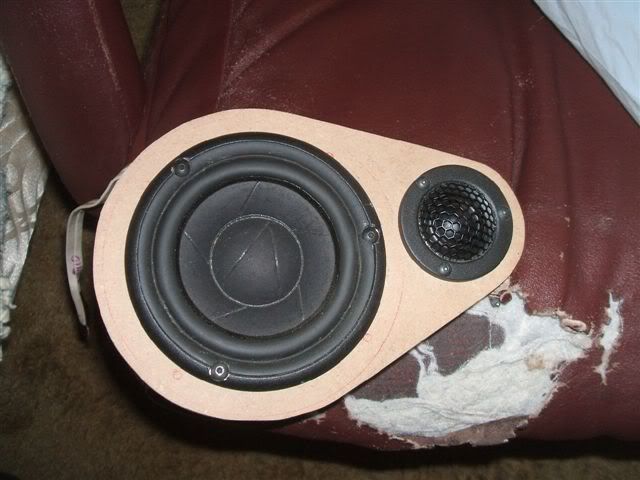
SPEAKER MOUNTS: MID/TWEETER PODS - These were designed to allow the drivers to fit as close to the outer edges of the cabin as possible. The pod mounts are easily adjustable and the drivers are easily replaceable if needed. One try of Scan 12ms and I was sold... although I settled on the Illum tweeters for size, the Hiquphons were wonderful too. I tried these on the pillars for a bit, but they simply sound better and build a better stage from down below. They're also more stealthy than the pictures imply.
Image

Image

Image

(END PAGE ONE - CONTINUED)
 
#2 ·
SPEAKER MOUNTS: SUBS - Why I had to fall in love with the 11" deep JBL sub, I don't know, but it was he!! to fit in my trunk!! This enclosure was a mess to make and took literally a hundred + hours (rookie issues), but it fits, looks and works great and might be my single best piece. Double 3/4" mdf baffle and base, braced internally, many layers of glass, fill sand and resin, topped with rubberized rockerpanel coating...
Image

Image


AMP/PROCESSOR SHROUD - TRUNK: This is a daily driver... so I'm not tossing the spare for anyone! Instead, I replaced the foam and stock cover with a layer of plywood, carpeted it, built braces into the spare well and set it up for easy removal in an emergency. For a topper, I built a sideless shroud with windows for viewing the pretty lights, some subtle LED lighting (yeah blue - but I had no other options). I dyed the trunk lining black, used black carpet and topped the shroud with black vinyl. For those days when I actually want to USE my trunk, I made a fitted black rubber cover to keep the vinyl in good shape.
Image

Image


FINISHED PRODUCT

DIE HARD PLATINUM - 1/0 - BIG 3+: Went through a Honda 5 yr battery once a year until Big 3 - the DH Platinum has 4 yr free replacement and 4 yr additional warranty... and just cranks out the power! Great battery.
Image

CANARE SIGNAL CABLE - VIABLUE RCA's - BELKIN PURE AV COAX - SYMBILINK: Straight coax digital to the trunk for audio and some video, aux/ipod and other video analog. Canare quad is wonderful and durable and the Viablue (high percentage copper alloy) locking rca's were a closeout steal! Short analog runs - well removed from power sources - Can you say zero noise?
Image


KICK PODS - SCAN 12M and 3/4 ILLUMINATORS & DOOR BAFFLE - MOREL MW265: best tonal balance and most musical low end I've ever achieved with a nicely centered stage. It all came together but only after a lot of work.
Image


UPHOLSTREY: I just hated all the plastic in the doors... I used matching quilted upholstrey fabric on: door panels, door baffles, center console, remote mount and the monitor baffle. No fuzzy dice in the future though... too close already!
Image

Image

(END PAGE TWO - CONTINUED)
 
#3 · (Edited)
MEDIA PLAYER: Hated digging for CDs to hear 1 song - Ipod transfers used to suck and limited size. Decided to lead this time, so I set up a system centered on the Sarotech DVP260 media player and a 500gb hdd. It outputs either coax or optical for the audio and I'm using standard RCAs for the video. For easy removal, I created a quick release, slide-in system and threw in a fan to cool things down. Using only lossless wav files... sounds incredible! One of my favorite investments... but took some serious work to get installed and set up conveniently!
Image


SYSTEM CONTROL CENTER: I finally decided to go for convenience and safety over stealth... couldn't have both. The entire system is controlled from this lil bugger and it sits right near my arm's natural resting spot. Audio/Video- playlist/folder/random/pause and much more in one easily memorized remote. It even allows you to go to a specific time in any movie you are watching (e.g., 1:14:06). I rarely need to look down...
Image

HEAD UNIT: Obsolete - had one but didn't use it! :laugh:


VGA MONITOR W/ TOUCH SCREEN: The standard hideaway 7" computer monitor that doubles as the main control and video screen. I may go back to the indash double din at some point, but this set up reduces glare and offers flexibility. This is the menu selection screen of the media player:
Image

Custom background displayed when playing music:
Image


TRUNK ELECTRICAL PANEL/BATTERY: Push the Bit One Remote button and the simple relay board makes sure the right power goes to the right places and everything is protected by an easily replaceable fuse. The Stinger in the trunk maybe be overkill, but no dimming and its faster than standard batteries in releasing power to the amps...
Image


FINAL TRUNK SETUP: BIT ONE - MCINTOSH MC440M - ZAPCO REFERENCE 750 - JBL GTi 12" I'll admit that I never really used any mid-range amps-going straight from Alpine basics to the McIntosh/Zapco combo, but still! I just love the Big Macintosh's build quality, appearance and excellent performance. There is a reason that so few companies amps at 15+ years are still selling on ebay for a pretty penny. The Zapco also has plenty of output power (bridged to 750) to drive the single JBL GTi 12. I'm not the only fan of this JBL sub series... in fact, its one of those rare products that I've never seen a negative comment on - anywhere! The Bit One... well, there are several great options to fill its role, but its well laid out, sounds great and is quite attractive as well.
Image

w/fan
Image

at night - and yes, another blue system. I blame McIntosh and Audison!
Image

Sorry this is so long, but hopefully it was worth the look! Thanks to all who helped me bring this thing to a thundering conclusion - you guys rock! :cool:

Less - aka - Jim
 
#4 ·
Looks good bro

How does it sound???

How do you like having the mid and tweet in the kick panels?


I have my mids in kicks but tweets in sail panel and it seems to work best for my car...
 
#8 ·
NICE NICE NICE! I have to know though, since I'm looking at something similar, do you have some better build pics on the sub enclosure? What about specs? cubic feet? Stuff like that. What do you think about the mid range and tweeters in the kicks?

Very very nice build! You did a great job!
 
#9 ·
Looks good!

I hope I'm not going to spend another 4 years in my install, mmm maybe?
 
#23 ·
It sems like I had rattles BEFORE I cut back the door card and allowed the drivers a more open path. While I certainly wouldn't advocate most people to cut their doors apart, there might be another solution. One "standard" 6.5 grill I tried fit perfectly into the groove that runs around the outer edge of the stock speaker grills. If you could figure out how to secure a grill there firmly, then cut out the stock grill, I think you'd go a long way to reducing the energy that gets trapped back there. Before doing this though, I'd take the door card off and see if the rattles you hear stop and see if the sound changes enough to warrant the work. If you haven't already done it, another suggestion would be to build a beefy MDF baffle and bolt it firmly in place (I've had good luck with brass hardware fwiw). Modeling clay or strips of butyl rubber can be pressed into very specific rattle locations too.

VERY nice work on all aspects. And nice gear.

I have the 3" Founteks in the a-pillars right now, but would like to go to a kick install. Do you have any issues with getting enough SPL from a 4" mid down there while driving at highway speeds?

How far off-axis would you say your mid/tweet baffles are? Do you have any widescreen shots that show both doors & kicks simultaneously?
It seems like I have all the volume I'd ever want... buy maybe someone would want more. I'm running each midrange from roughly 300 - 5k off one 50 watt channel from my McIntosh 440M and it seems at least as loud as any other installation I've done.

I'd guess that the pods are roughly 20 degree's off-axis. They're set to cross above and slightly behind the stick shift iirc. Sorry, no photos that show the entire front stage atm.
 
#11 ·
Hey all

Thanks for the kind words. I forgot to mention that the monitor and touch screen connections extend from under the console, so I can whip out the laptop and use it for different things if I want. I've tried streetdeck and some other software along those lines but finances limited exploration there. If employment happens, I'll GPS that way at a minimum. I'm also just toying with the idea of taking the 14" dell laptop monitor I have sitting around and trying a silly idea I have about molding it into the head unit spot with bondo and such... realistically, 10" or so would seem as big as you'd want for a car, but maybe I could make this thing not look "overdone."

I had the hardest time accepting that no matter what - it always sounded best with all drivers in the kicks! It just seems so counter intuitive! Still, its just true - at least with the drivers I've been trying. I built the latest pods fully thinking I'd end up with them mounted on the pillars (hence the small illum tweeter when the HIQ and Air Circs sounded great). In the end though, kick mounting just had better staging formation and imaging, plus it just seemed tonally superior... full, rich and vibrant.

The system moved from the "sounds pretty good" stage to the "OMG I did something right that time!" stage when I added the first true mids (scan 12m). To me, it sounds remarkable - or I probably wouldn't have called it finished. I think the reasons it took so long were: 1. I'm a sucker for something new (rebuilt for the B1 when the DRZ sounded great), 2. kept trying pillar mounts. 3. I dreaded the sub enclosure job - it intimidated me... so having it turn out great just rocked! 4. I liked upgrading and rethought projects after they could have been done lol.

Rattles? Sorry, no rattles for me... guess I got lucky. I think that heavy and large baffle honestly helps braced the door though. Its bolted in at least 6 places and then the damping and foam fillers make sure it isn't a source of noise itself. Just wasn't a trouble for me...

Scoot - I'll add some shots on the sub and give a quick run trhough on what I did in the next post. Keep in mind, I might not be the guy to learn the RIGHT way to do this from though lol. I muddled my way through and got lucky with a nice result!

Less - aka Jim
 
#30 ·
I had the hardest time accepting that no matter what - it always sounded best with all drivers in the kicks! It just seems so counter intuitive! Still, its just true - at least with the drivers I've been trying. I built the latest pods fully thinking I'd end up with them mounted on the pillars (hence the small illum tweeter when the HIQ and Air Circs sounded great). In the end though, kick mounting just had better staging formation and imaging, plus it just seemed tonally superior... full, rich and vibrant.
Odd. I have the exact opposite opinion of what speaker locations sound best (in the same car). I've tried tweeters close to the midbass and never really liked the sound. Moving the tweeters to the sails or a-pillars made all the difference. Stage height, detail in the upper frequencies... Even with the MS-8, the tweeters around the dash created the best stage for me.

Just shows you that different people have different preferences. Everyone should try and experiment for themselves.
 
#12 ·
Ok bud a couple things for you. First one is I LOVE THE RCA's! Those look sweet!

The Mid Range and Tweeters. You said you tried them up in the pillars and they didn't sound as good as the kicks? Did they just not blend as well, did they sound harsh, what was the difference between the two? Again with the pics, do you have pics of how you did the kicks? It almost looks plastic, like one of those pods you buy would can buy online. Sorry that wasn't an insult, I'm sure it blends real well with the interior. I'm just curious about your application, or how you went about it.

Third, I also see that you have carpeted the pieces under the dash, or at least that's what it appears like to me. What was the purpose of that? Just to dress it up, to prevent reflection, what? Just curious about this. BTW, I HATE THAT PANEL! Mine for some reason falls off all the time. I think the clips are bad. Moving on!

BTW, it look like someone could use a new computer chair for christmas!

Fourth, how does the Sarotech DVP260 media player integrate into the system. I'm very interested in this. I have an ipod touch, but i don't really care about using that. What I really want is something to put a ton of movies on. I drive in my car daily, and I have my girls in my car for about 2 hours a day. I have monitors in the headrests and if I had something to have all or most of my movies for them then I don't have to have multiple dvd's in my car all the time. I've tried burning them onto my ipod but it never works out. Right now the audio and video is off. Meaning the people talk and about 1.5 seconds after they say something on the screen the audio comes out. Anyway, I'd love to get your input and suggestions on this media player.

Lastly, your sub! I think mainly I'm curious of what your airspace is for that. How much does it protrude into your trunk space etc.?

Sorry this is lastly, I love the electrical panel idea mainly cause I do alot of that in my builds. I think, however, you could do yourself a favor in cleaning it up a bit by using one of these:
Image

They also have a 6 port one, but it just cleans things up a bit, uses one main power source, and it was only like 35.00. So for what you get, seems pretty reasonable. They also have a dual, power and ground, one as well. Here's a link: Fuse Blocks & Fuses - Blue Sea Systems

I think I got everything covered, LOL. Overall, very nice work!
 
#17 · (Edited)
how does the Sarotech DVP260 media player integrate into the system. I'm very interested in this.

Lastly, your sub! I think mainly I'm curious of what your airspace is for that. How much does it protrude into your trunk space etc.?

I think, however, you could do yourself a favor in cleaning it up a bit by using one of these:
Image

Here's a link: Fuse Blocks & Fuses - Blue Sea Systems
Um, yeah, busted on the chair. I actually have one that is newer, but this one just fits me too well :D Since I'm so long winded (erm, thorough!), I'll break format this for easier reading lol.

FUSE BLOCK
First, I love that fuse block's look man, but I'm not sure it'd do what I need for a couple reasons. 1. When I first looked, I thought it'd save a lot of space, but I'd still need to mount - jumpers from the relays to the outputs, the relay itself and grounds, right? (I now see they have a dual model with grounds - Nice!) 2. can you use low amperage and slow blow fuses on the board? Looks like car fuses and I use mostly under 5 amp fuses for lighting, the Bit One, the remote turn ons and such. Still, I'd love to use something more attractive... I was pretty broke at the time and picked this one up used for like $3 then polished the brass up lol.​

MEDIA PLAYER
The Sarotech could be terrific for you actually. Its easy to connect, but I like having a nice permanent slide mount installation for easy removal. Its not required though. From its outputs: one RCA runs to the dash for video, one digital and one analog audio to the trunk for audio (Digital for full time music and most movies - Analog for those movies that have sound encoded outside the Bit One's parameters). My monitor stays set for the media players output 99% of the time, but can also be changed to monitor either my laptop or my ipods video out. The remote has an extension that I've mounted inside the remote holder and works well.

I'm sure you could easily integrate it so that it played to your headrest monitors and I'd bet you could rig it so they could each watch seperate shows and listen via headphone and only have to but the media players and headphones to try it out. For video only, the DVP 260X model is great! Stop at any time and it auto marks where you were... hit bookmark when you turn it on and it shows you the last 5 places you stopped. If you want detailed info, search the word Sarotech for my posts... there is complete information from me and others about their installation and use. After that, feel free to PM me and I'll answer any questions. Personally, I love it.​

SUB INFO
As for my sub, the JBL is 11" deep and made it so that I had to corner mount it instead of making one that was a nice little rectangle that ran along like the wheel well. IIRC JBL suggested 1.25cft and thats almost exactly the volume I ended up with. It sticks out about an inch beyond the edge of the panel that you lift to access your spare - at its deepest point. This shot from the back seat should show you how it fits in a bit better... and you can also see how the wiring is handled under the shroud...


AUDISON SFC
I also should through in that I had a working prototype of the Audison Signal Frequency Converter - the product they're selling for $200+ that converts all digital input signals to a standard that the B1 works well with and eliminates a slight hiss that occurs in some cases. Sadly, it worked a couple months and then decided it won't work until after the system's been on for 15 minutes... we'll see how it works out, but its sort of disappointing so far.
Jimbo
 
#18 ·
Thanks! I had the cheapo box for the sub for soooo long, solely because I was scared of messing up a custom enclosure. The spot was hard and that JBL is friggin deep! I've not seen many trunk installs that kept the spare intact and still allow nearly full use of the trunk when required. I gave up 2.5" of depth though.
 
#14 · (Edited)
Thanks again all. It's really nice to finally feel like I"m done and to have it sound so good. I'd be lying if I didn't say it was nice to access all my music/video so easily too though - haha. When will the major players learn to just build hard drives into their hu/monitors? Won't that just be nice?

Scoot - rather than post a tutorial like I just had posted, I'll find another way to try and answer your question on that. I need to get applying for work now though... so more later.

Jim
 
#15 · (Edited)
PODS - PILLAR VS KICK: (Editted for easier reading)

EARLY TESTS:
One of my first first longer term speaker sets was a set Rainbow Profis and I used various mounts on the Apillars for about a year. In the end, I couldn't get them tbe strident edge out of them no matter what I did (xover - eq - angling - dash mats - etc) and ultimately, thats why I moved to something new.

Thinking it was probably the driver, I tried a variety of other tweeters and they all suffered the same issues. Somewhere during this process, I met a friend/mentor who I trusted enough to try things that didn't make sense to me - namely, Kick mounting! Thank God as my sound began to improve with each new effort. Just for kicks... here are some shots of past installations:​
An early tweeter mount...


Focal K2's mounted to door - due to terrible design, the door card messed with the midwoofers output terribly... so I built the large wooden baffles in my later installations


The first larger baffle with a great Focal Utopia 7 and Hiquphon OW1s in a hokey mount - velcroed to floor with a grill - actually sounded good


Fiberglass kick enclosure for 12m and Air Circ (excellent sound - stage not as wide as current - close 2nd place sound...

LAST TRY:
Still, I was stuck thinking that having drivers up at shoulder level was the thing... after all, you don't see many people with floor mounted tweeters in the home environment now do you!? In a final effort to get the most out of my system, I decided to build pods, the details of which are below.

After several attempts at mounting them on the pillars, I went back to the kicks and they simply sound better in almost every way. The clearest reasons are stage width and the richer, fuller sound that resulted from the move. Up top, the drivers are significantly closer together so its natural that the stage width is differnt... but its more pronounced than you'd think. Plus the glass up top reflects higher frequencies more than the absorptive material down below.​

FINAL RESULTS:
My stage width is remarkable - height is good too. The midrange is just full and rich, and the low end is very musical... sounding like instruments instead of just a punching sound like I've heard in so many of my systems. The high end sparkles and is airy but its eq'd a bit... overall though, I use minimal eq correction. I apologize that my description of the sonic comparisons aren't very revealing... but the difference is very noticable and I've totally given up on what seems like the 'logical' approach of mounting on pillars for now.​

UNDER DASH COVERS:
Yeah, I did carpet the plastic panels down below. I don't honestly know that it makes any difference, but it does look a little nicer and I thought it wouldn't hurt perhaps stopping some vibrations and reflections. IIRC there is ensolite underneath the carpet. One of mine has a broken clip now too - from someone kicking it accidentally. I think I'm going to drill a hole and use a wire tie in a hidden spot to get it back in place long term.​

POD BUILD INFO:

Here is another shot of the pods that might give you a better prespective:


DESIGN: I built the pods as small as possible to allow for maximum closeness to sides of vehicle and to minimize the amount of extraneous noise generated by the baffle/enclosure - maximizing the speakers output instead. My design concept included: MDF - extremely minimal baffle size/material - damping if possible - rounded wherever possible with shallowest angle easily achieved - minimal depth - and solid and versatile mounting posts.

BUILD: From 3/4' MDF, I cut the smallest baffle I could - putting the mid and tweeter as close as possible. The baffle was routed, the mid hole was chamfered for max air flow and t-nuts glued in place for driver mounting. Then, I cut, stacked and glued baffle-shaped "rings" of mdf until the sides were at the right depth. I promised not to mention more about the remaining design, aside from saying its generally a sealed design.

DETAILS: They're are attached to the sidewall of my kick area using fairly standard swivel mounts like those used for home theater surround speakers. The finish is the same rubberized rocker panel coating - it looks like textured bedliner. The grills are a wire trash can pounted into an mdf ring, then glued, painted and velcro'd into place.​

Less
 
#19 · (Edited)
very nice!
what x-over points and slopes are you using on the mids and tweeters? (scans)

Ill be using the mids and tweeters ! :)
 
#20 ·
My xovers are 60/70 - 300ish - 5k. You can go lower with the mid but I prefer mine here. I'd like to try the new Scan mid for a couple reasons actually... have you thought about that??

Also, if you don't need the small size, consider the Hiquphon OW1 tweeters too... very fine detail, nicely airy, great dispersion and handmade goodness! I know a fair number of folks think its a better tweeter overall - but all speaker selections are subjective for the most part. Either way though, if you get the installation right, I can't imagine a result you would be unhappy with! Those drivers are certainly strong performers. (BTW - the Revelator cones are sensitive to even small amounts of water - don't wipe them with even a slightly damp cloth lol!)


Image


Scoot, my bad on the fuse block deal! The one above uses the AGC fuses I'm currently using and they actually DO make 1amp car fuses (although not slow blow). By using a version with the ground strap, I could make it look a lot neater... although I'd still need to mount and fuse the relay itself somewhere near the block.

Now if I can just get through this second interview... lol, wish me luck!
 
#21 ·
Actually what you could do is what I did with my other install under the seat. Use a box. I used a small plastic box to house my relay in, you have wires going in but if you loom it or tech flex it it would clean it up and cost you minimal money at best. Matter of fact I may have an extra box and some extra flex if you need. Let me look and I'll let you know. Here's what I was talking about.

Here's the picture. The wires you see in the foreground are the wires for my headrest monitors. Had to make sure they could separate to remove the seat. But the box in the middle is what I was talking about. The smaller of the three boxed behind the fuse holders. The relay is in there and the box hides the mess of wiring. You can't see the wiring between the three boxes but I drilled holes to enter into the middle box from the fuses and then through both side to the thinner boxes. It just hides them really well. The thinner boxes are big enough to put a couple barrier strips in and wire them up, but not tall enough for the relay. I could've forced the issue but it wouldn't have looked right. They use screws to hold the tops on them.
Image


Here's a picture of the covers off.
Image


Again, these boxes are pretty cheap, like 5.00 - 8.00. I'll look and see if I have any left and if I do I can send it to you. Save you some mula!
 
#22 ·
VERY nice work on all aspects. And nice gear.

I have the 3" Founteks in the a-pillars right now, but would like to go to a kick install. Do you have any issues with getting enough SPL from a 4" mid down there while driving at highway speeds?

How far off-axis would you say your mid/tweet baffles are? Do you have any widescreen shots that show both doors & kicks simultaneously?
 
#25 ·
What I did is but the mid bass in doors. The mids in kick panels on axis to the driver and the tweeters are playing 8000hz off axis in the sail panels and my car scores well and sound really good ....

My car did not sound as good with A pillars also....


Great build bro :D
 
#26 ·
Hey Mr. Stangbang,

Curious what mids you are using and if you are crossing them lp at 8khz to the tweeters in your sails? Oops, it looks like the mids are Focal BEs... yes? Also, what you do hp them at? I always wanted to try a set of those buggers, but I've never seen them for sale at any price I could honestly consider.

I had a K2P set and really liked the mid, but the tweeter was either hit and sound absolutely incredible or miss and sound pretty hard. With that mid going up so high though, it probably makes a heck of a nice set up.

Sydmonster... getting me to like it was definitely the tough part lol! I'm a bit on the obsessive compulsive side like Scooter I guess, but it does have its advantages too!
 
#27 ·
Sun Glare! The angle on the straight 2din installation is just terrible in the civic, no matter how nice of screen you have! A recent ticket forced me to remove my side window tint - making it even more bothersome!

Solutions? I'm thinking about building a double din or maybe even a 10" monitor into the dash, but changing the angle, making it flexible like my current monitor, or building some sort of visor. Anyone seen any good custom jobs for in dash monitors, or any other tricks that help keep the screen highly visible?

Assuming I either get a job sometime soon, I'd really like to try something creative. The fiberglass and bondo isn't too expensive and I have most of the supplies.

Thoughts?
 
#28 ·
#29 ·
Oddly, when I first built my relay board, it was in one of those boxes, but sadly it outgrew the thing - too many connections. Plus, I couldn't get the relay itself to stay in place... don't think it has a screw hole and glue didn't work really well. When springtime comes around, if I've found work (grrrrr!) I'll probably get excited about neatening up that part of the installation. I finished it up when I was short on bucks and had to skimp more than I'd have liked.

I'm also toying with the idea of mounting my mids by building an angled wooden baffle that I'd mount to the metal of the kick panel, pulling it even further to the side and creating some sort of either sealed or ap vented "enclosure" into the metal area between the outer and inner metal skins. I'd go straight to the metal, but I'd be too far offaxis to work well. Every inch further you can get the mids to the sides, the stage seems to get several inches wider.

I've been doing the audio book thing a lot lately though, as I think I've burned myself out on music for a bit. I do that now and then and take a break... still, even when burnt there are some times that music is the only thing out there that will sooth!

Thanks for the comments, suggestions and for stopping by my thread =)