

I have been searching for a method to do this and haven't found much all in one place so I thought I'd post my results and findings here in the hope that others who are looking might have an easier time finding info.
So, let's begin... Accurate IR measurements can be obtained from a USB mic by using the Acoustic Timing Reference. This has been stated on this forum, REW, diyaudio etc. However, there is very little info I've been able to find describing how to set that up and interpret the results.
The equipment I'll be using for this is Room Eq Wizard 5.18, a MiniDSP Umik-1 mic and the Helix DSP.2 processor running v4 Software.
You'll need a 3.5mm to RCA (Y adapter) in order to utilize the Analog output on your on board Soundcard.
It goes without saying that you'll need to configure your mic and calibration file in REW. Once that's done you will need to configure an Acoustic Timing Reference as well as your desired output.
Go ahead and plug in your Y adapter to your onboard sound card and connect the Left and Right channels into your DSP Analog inputs while the DSP is powered down.
Open Room Eq Wizard
Go to Preferences > Analysis
Choose "Acoustic Timing Reference" from the drop down menu
- Note: The "Set t=0 at IR peak" by default is checked and greyed out. This is primarily why the delay values generated by REW that you see in the Measurement Notes are inacurrate. Either way I prefer to manually calculate this as you will see.
Now go to Preferences > Soundcard for the "Output Device" choose your onboard Soundcard in the drop down menu (or any Soundcard you have installed that has an Analog output)
For the "Output" choose your Analog output - this could be variable depending on your system and the output naming in my case this is labeled "Speaker"
The drop down box that contains "Left" "Right" or "Both" will configure the default output channel(s) when performing a Measurement using Acoustic timing
Choose "Left" from the drop down menu
Make sure your Mic is recognized and configured as the Input Device on the Soundcard tab
Close Preferences
In this tutorial we'll be using Analog Input Channels 1 & 2 on the Helix DSP.
Connect to your DSP and launch the Software. Now we're going to route the Channels to the necessary outputs.
Since the furthest driver from the LP is usually the passenger midbass that's the channel we'll choose for our Acoustic Timing Reference (this should be configured for your further distance driver).
So we will route Analog Input 2 (Right Channel Input) and route it to the Right Midbass which is Channel F in my setup.
Now we need to route the Signal Channel. We will route Analog Input 1 (Left Channel Input) to the Right Midbass which is Channel F in my setup.
- Note: We are routing both the signal and timing reference to the Right Mid Bass driver to establish our reference measurement.
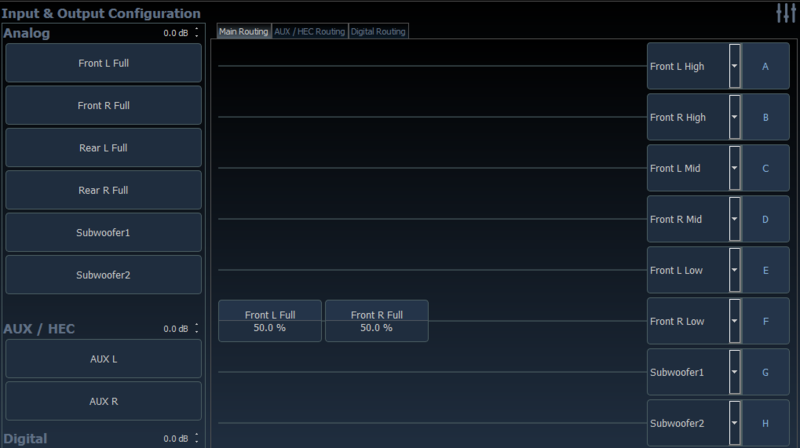
Mute all other output Channels in your DSP
Bypass the low pass filter on your midbass output channels in your DSP
Adjust your Volume Control in Windows to an appropriate volume level
Click Measure in REW
In the measurement window it should have "Use acoustic timing reference" displayed
Choose 1000 Hz as the Start Freq and 1001 Hz as the End Freq choose an appropriate db level
- Note: Low frequencies cannot be used for IR as the wavelengths are too long. You will need to choose a freq that can be safely played on each of your drivers. I use 2.5k for tweeters.
Make sure the correct Ouput is displayed in the measurement window
Make sure "Right" is displayed as the Timing Reference Output
Make sure "Wait for timing reference" is checked
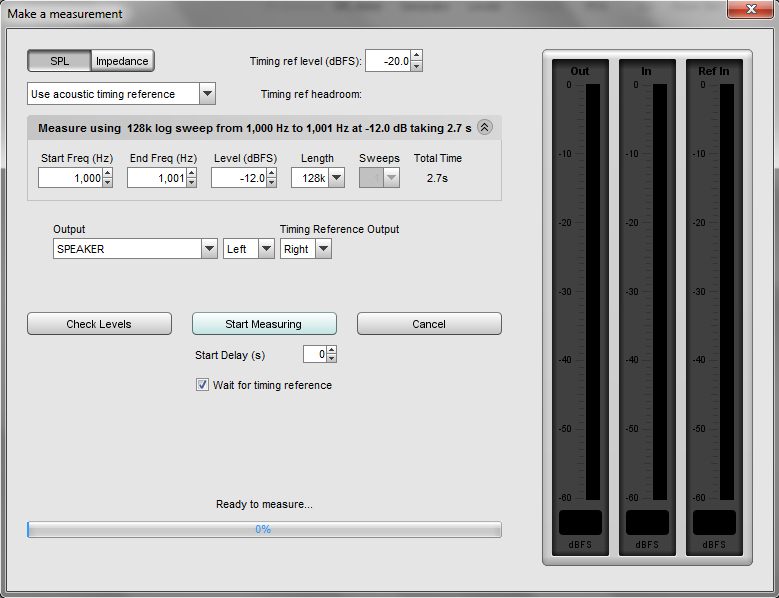
Click "Check Levels" to make sure you are not clipping anything in the IO chain
Click "Start Measuring"
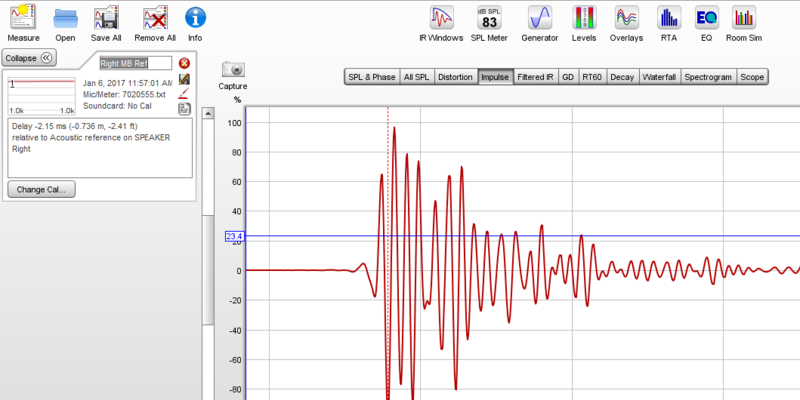
Once Measurement Completes rename to something like Right Midbass IR Reference
Click on the Impulse tab
Change dbFS to %FS
Zoom in on the Graph at 0
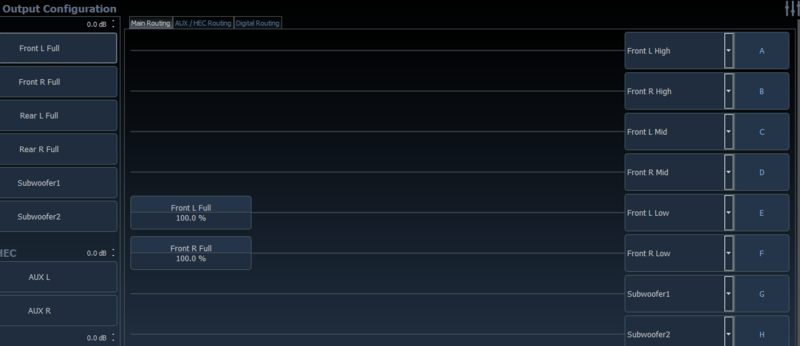
Change routing in your DSP to Left channel -> Left Midbass
Unmute the Left Midbass Output Channel in DSP
Click Measure in REW
Click "Start Measuring"
Once Measurement completes rename to something like Left Midbass no TA
Open the Overlays window in REW
Go to Impulse tab
Change dbFS to %FS
Zoom in on the Graph at 0
Once you see the scale at 0 - 2m that should be sufficient
Make sure that both Measurements are visible in your Overlay window
Click on the Graph at the first point where the Impulse begins to rise for the Left Midbass Measurement
You will get the blue crosshairs and a time in milliseconds

Plug that number into your Calculator in Windows
Follow the Blue line to the right until it intersects the Impulse response for the Reference Midbass
Click on the Graph at that point
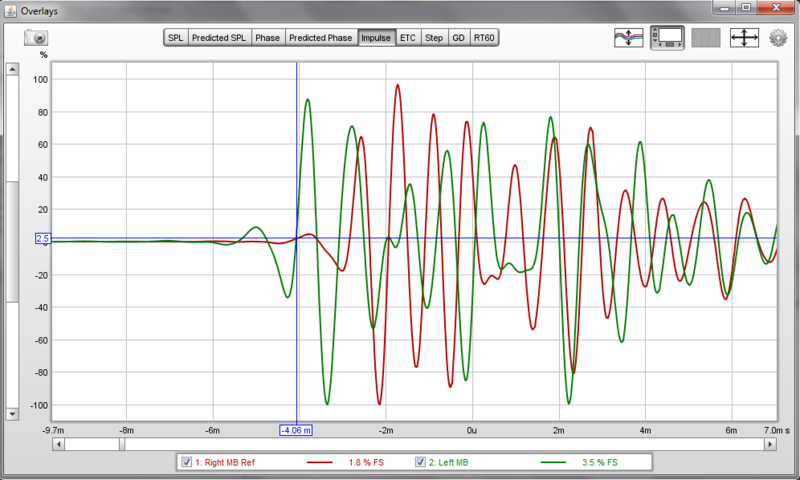
Subtract that number from the first in your Calculator
This will leave you with the amount of delay to add to your Left Midbass, in our example 1.27ms
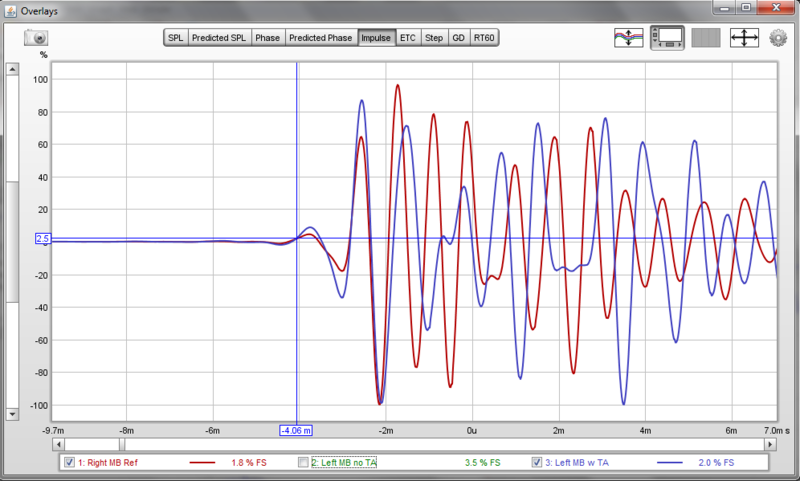
Add the Delay in your DSP for your Left Midbass Channel
Run another Measurement in REW
Rename it something like Left Midbass w TA
Open Overlays > Impulse tab and remove the Left Midbass no TA from view
You should now have an aligned Impulse Response
Repeat the process for your other Drivers and ENJOY!
I have performed TA via tracerite, doppler effect, inverted phase and tones and this method. I've gotten far better results with this method although the phase and tones did arrive at closer numbers to the IR measurements.
Give it a shot and see what you guys think.


