DIYMobileAudio.com Car Stereo Forum banner

2014 Audi A7

83K views 188 replies 34 participants last post by  Hugg727  
#1 ·
Hello everyone, I am entering the final stages of my build so I figured I would start putting some pics of the journey on here. Those us that own Audi's know how bad the stock sound system is in our cars. With the exception of subterFuse's incredible build in his S6, there aren't many documented builds out there in the Audi community, especially ones that upgrade the standard (non Bose/B&O) sound system. My hope here is that I eventually help someone else upgrade the system in their car. So on to the build...

My 3 main objectives are to

1) Build a decent SQ system (i have no intentions to ever compete) that I can enjoy, as this is my daily driver
2) Keep the car totally stock looking to the casual observer
3) Do this entire install myself and learn a little something in the process. I have done some decent systems in the past but never on a high end car like this.
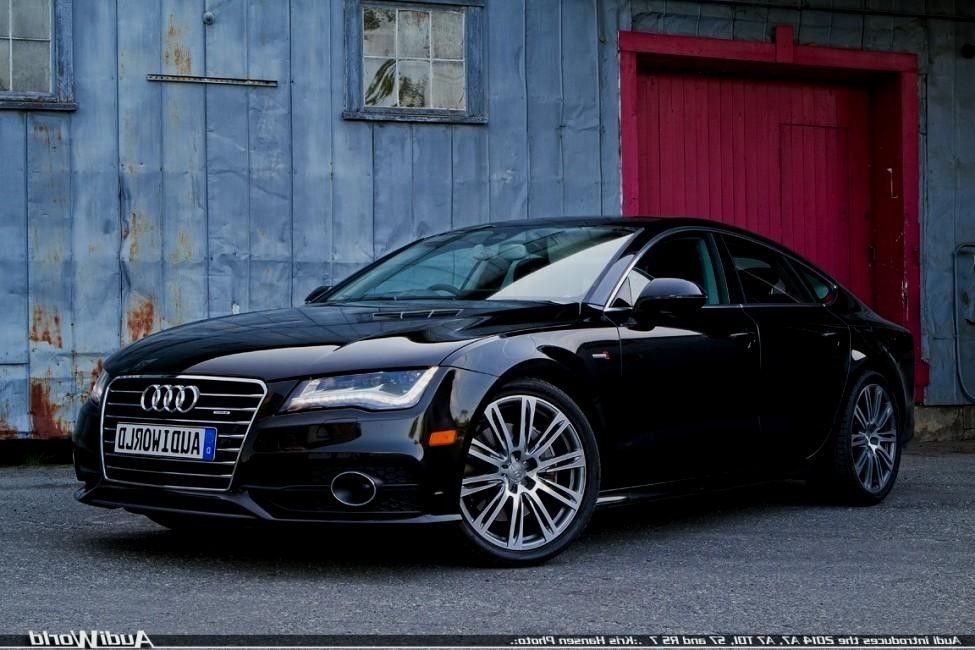
So here is the car

 
#3 · (Edited)
I bought the car new last summer and within a month or 2 I had realized that the car had abysmal bass.

Mostly because of this cheesy stock sub enclosure in the spare tire compartment. You know its bad when the sub has a 6" driver and is mounted in a plastic box in the spare compartment!


I decided to do a quick upgrade , knowing that winter was coming and I probably wouldn't have time to do a full system upgrade. So after going through the various Audi forums I saw that many owners were just tapping into the rear signal, using a LOC and adding a box in the hatch area.

I decided that this would hold me over until spring so I bought an Audiocontrol LC2i , a JL Audio XD300/1 mono amp and a JL Powerwedge with a 10' TW3 driver in it.

I made myself a carpeted shelf for the amp and mounted it on top of the stock radio bracket. This is where the Bose or B&O amp would actually go if I had that option. I mounted the LC2i in the space between the radio and the new shelf. With the battery being in the trunk it was easy to add a properly fused power lead from the battery.


This was OK as a quick fix as I was still all stock and could control the sub controls from the stock MMI head. Until now.......
 
#4 ·
So over the winter I researched my options and I came up with this as a hardware list

Amp - Mosconi D2 80.6 DSP
80w x 6ch plus a full 6to8 dsp. All in a package small enough to fit on my little shelf. This will allow me to run a 2 way active setup in the front and a set of components, passive, in the rear. I know not everyone is a fan of rear fill but remember, I don't plan to compete and I do promise to follow the Rear Fill Best Practices mentioned elsewhere in this forum :D

This will also allow me to send a processed signal via pre out to my JL Audio amp that I will maintain for my sub amp to drive my JL Powerwedge.

Pre Amp/MOST Bus Interface - Audison Bit DMI
So I originally tried to buy a mObridge DA1 but no one in northern NJ could find one of these. As luck would have it, another member on here (JimmyDee) was nice enough to sell me an older version that works perfectly. In all of the craziness of ordering gear, wires, tools, etc. I actually forgot that I had ordered the Audison from a dealer about 2 months earlier. I actually had the mObridge installed, working beautifully, in the car when the dealer called to tell me to come pick up my Bit DMI. This is ok, my son is planning a build for his BMW, that also uses MOST, so we will use it there.
 
#5 ·
So I have no pictures of any sound deadening in the doors because I did that back in the fall to help the stock speakers right around the same time that I installed my sub upgrade. It was a good layer of dynamat inside the doors and on the outside of the door, internal to the car I used Cascade Audio's VB-2 as a moulded layer between the metal of the door and the door card. You will see it in some pictures of the front doors, but this stuff is pretty cool, using a heat gun it moulds right to the contours of the door and is very thin. The stock sound deadening on the door card was pretty good so I left it alone.

With all of that said lets run some speaker wire.

But first lets color code it with some Techflex

Make sure its all labeled up right


There are some nice generous spaces to run wires in the Audi. An added plus is not worrying about crossing signal wires and power wires since everything is in the back of the car.


I basically ran them right next to where the stock wires are and used most of the cable management that is already in the car.
 
#6 ·
This is really cool, thanks for sharing.

I plan to purchase an A7 sometime in the future, and of course while day dreaming about it I question what I will do for audio. Not many build threads out there for the A7 so it's nice to see this.
 
#8 ·
Its a great car. If I could do it again , I might have gone Diesel, the specs on it are crazy good.
Save your money on the audio options they are all crap. Wait until you see the stock drivers....a magnet the size of a silver dollar on an 8" driver :furious: in a $75k Base model car?
 
#7 · (Edited)
Of course nothing is never easy..I ran into these Molex plugs in the front doors, the rear doors were easier because I actually was able to move one of the pins. I drilled out( carefully :eek:) both sides of the plugs with the Dremel using a bit that looks like something a dentist would use. It does a tiny bit at a time and I was very careful and sloooow using it.
A big thank goes out to Octave, who did subterFuse's install, for giving me the idea and courage to go this route, like he did on that S6.


It was sung but I got it through on both ends
 
#9 ·
So on to the speakers. Again I want looking to build a sound competition car so I went with modest but decent components sets for the front and rear

In the rear I went with a set of Focal AS130's, its a 5.25" driver. I will run these passive using the supplied crossover and 2 channels from the Mosconi amp.


Tweeter fit right into the door card and looks good

Did a fair amount of deadening inside and out on the rear doors. Note...I had to move the crossover from the location that you see in the picture. This a pic of the left door and I was getting this weird static out of the tweeter whenever I would start the car. I moved it to the left of that sensor that you see in the "pocket" that has the yellow wire coming out of it.

Finished door...lines up pretty good
 
#10 ·
On to the front stage

I picked up a set of the Focal PS165 components. I will run these active using 4ch on the Mosconi amp

Front door...the CAE VB-2 is a really nice sound deadening option and it moulds to the door nicely.


I added some Dynamat on the bottom plastic section to the right of the driver, e VB-2 would not stick to the plastic. Obviously I repeated this on the left side


So this is the part that I wasnt most proud of. Its the only non- stock looking part of the install. I didnt just want to drop the tweeters into the stock dash locations. I want to keep the tweets on axis and the Focals came with a surface mount option. They dont look terrible but short of building custom pillars, it was the best I could do. All I did was drill a few small holes in the stock grilles and mount secure with a small screw/bolt combo. I also have a spare set of Audi grilles just in case I screwed up:cool:
 
#12 ·
Funny that you ask that.. if you remember back in the beginning of this thread I had a JL Audio power wedge box with a 10" JL sub in it. Dont get me wrong it sounds good but I had the opportunity to get one of these and I just couldnt pass it up......


Just a little tease for now, But we will get to the sub later...lets install the guts to make this thing go!
 
#13 ·
Ok lets talk about some hardware
This little guy will provide 6 channels of Class D power..80 Watts to be exact..and it has a 6to8 DSP built in as well. It is small

Really small

Its a well made piece of equipment

I bought the bluetooth module to tune and it also allows you to controll it with an Android or Apple device. I also bought the RCD as well.
 
#20 ·
My dream car.. this should be a good install with good equipment..
 
#25 · (Edited)
Ok so on to getting my electronic components into the stock factory cubby.

I will run the RCD up front later so lets get the Amp, Bit DMI, Power Disti and relay all set up.

The D2 is a good size and fits on my shelf nicely. This is what will face the door that opens up the cubby.


On the back side of the "rack" I mounted a Streetwires power disti block that takes in my man power/ground and provides 4 more fused power sources.

In the remaining space I mounted my relay and a terminal block that I will use for "Local" power and ground connections within the "rack". My "remote" system works like this... The DA1 turns on when it gets a signal via the fiber optic MOST network, I am using that as my main remote trigger for my relay. From there I just connected the Amps remote leads to the remote out on the relay via the terminal block.
 
#27 ·
Here is the finished product waiting to be put into the cubby. If you look close enough, under the shelf to the left I mounted the DA1 bypass switch. To the right of that is a red switch to control an LED light bar that I will mount inside the cubby on the top for some additional light.

The DA1 is on the shelf between the stock radio and my fabricated shelf, you can see the sliver Toslink cable connecting it to the Mosconi. Because I couldn't totally remove the radio from the MOST bus (it also takes in the GPS, Sirius and FM antennas in the car) I had to make my own MOST fiber cable that connects to the factory connector and allows both the radio and DA1 to connect to the ring. As you can see it has one female and 2 male connectors. I configured it so the signal looks like this MMI.....DA1.....Radio.....MMI.
 
#151 ·
Because I couldn't totally remove the radio from the MOST bus (it also takes in the GPS, Sirius and FM antennas in the car) I had to make my own MOST fiber cable that connects to the factory connector and allows both the radio and DA1 to connect to the ring. As you can see it has one female and 2 male connectors. I configured it so the signal looks like this MMI.....DA1.....Radio.....MMI.
Curious about this one, Hugg. I'm not quite following why you had to take this step? I thought that taking the MOST connector that was feeding the amp, and plugging it into the DA1 was all that's needed, and that the radio (looks like I have similar setup as you) could stay plugged in as is and they coexist on the MOST bus? Did you try that first and things didn't work? Any further insight is appreciated.

Thanks,
Per
 
#28 ·
Initially I was hoping to put all of my gear into that stock rack. That didnt happen, so I had to put my JL sub amp into the space where the old sub enclosure used to reside.

First let's make a nice Power/Ground Remote cable for it...

Here is a shot of the cubby with all of the wires run. You can see the factory loom where the MOST and antenna cables run under the rack. I ziptied the sub cable to my already installed feeder that is connected to the battery.

All connected , the back looked like this before a little wire clean up.

Sub amp mounted where the old sub was. I made another shelf and mounted it to the stock locations with some L brackets.


All in the cubby and working!
 
#31 ·
So I cleaned up some of the last few odds and ends today.

I built my new sub box...Stereo Integrity BM mkIV in a Atrend box

Dont get me wrong..the JL box was good, but for a few bucks more this thing gets lower and tighter. Finished in the car..

Final few pics of sub amp location
 
#33 · (Edited)
So I spent a few days tuning and figuring out the Mosconi software. Its not hard to use but its flaky. Makes changes on its own after I shut the car down. Weird stuff but Cobb has been fantastic helping me out. When it works it sounds good. I tuned it with REW and got it close, then I took it to a place that does this for a living. They were impressed that a 52yo software salesman did this to a new Audi. They helped a bit with the sound and I tweaked it back and forth when I got home. but I never got it where I was really wowed by it.

After a week to 10 days of tuning it every day I was actually disappointed in the sound. There was no staging, the mids sounded good, bass was excellent but the overall clarity and sparkle up top was missing. I started looking through all of the tuning threads for ideas and while doing that I learned a few things about the specs on each speaker. Theile Parameters...Fs...vMax..etc and I learned quite a bit from some really smart guys on this forum community.

I had taken a decent set of component speakers, that came with their own crossover and broke them up into separates. Before I did that I should have looked at the specs for each component separately. The tweeter that came with my Focal set has a resident frequency, fs, of 2950hz. Using the rule of setting the crossover at the fs, I would have to set the crossover at almost 6khz. The more I read the more I was getting mad at myself for not taking the time to research the speakers a little more. Then I even started questioning having rear fill. 80ch x 6 could be a nice little 3-way active front.

So after about 2 weeks of researching and talking to various experts this happened...:D

Big thanks to Huckleberry Sound for helping me with these.
I will be going to a full 3 way active front stage. I am currently looking into and talking to a few shops to build me custom pillars and/or tweeter pods. This will delay the final completion but I think it will be worth it.

I have already replaced the mids with the HAT L6SE Carbons and it sounds much better. I crossed the Focal tweets at 6k it just cleared up everything. I cant put the new tweets or the 3" mids in yet because I will probably have to give then to the shop as templates. But for now I am happy.


Please pm me if you know of any good shops that can do custom sails/pods in the NY/NJ area. Stay tuned
 
#35 ·
Nice, looks like you keep making this more and more interesting.

In regards to the speaker positioning, I think they will sound much better. I had some pillar mounted mid ranges in my last car that had extended range so I skipped the tweeter, it sounded amazing.