DIYMobileAudio.com Car Stereo Forum banner

2017 Alfa Romeo Giulia Ti Budget Build

13K views 14 replies 4 participants last post by  LBaudio  
#1 · (Edited)
I’m working on a build for my 2017 Alfa Romeo Giulia Ti with the base audio system. It’s a simple budget build and doesn’t compare to some of the incredible builds and equipment I’ve seen and been inspired by here in the past year of lurking. So many of you guys do awesome work. Recently another thread for this vehicle (with a nicer system) got bumped, and there was some interest, so to pay back some of all I’ve learned from you, I decided to cross post from giuliaforums, with a slightly different format for this audience.

For such a wonderful vehicle, the Giulia’s the base audio system is a travesty. It's simply worse than any car I've ever owned. The sound is impactless and flat, there is no dynamic range until volume 20 and it's harsh and tiring on long trips. The sound is unbalanced, with lots of cross talk from the tweeters in the rear doors near the driver and front passenger ears. I decided almost instantly I couldn't live with the audio performance. I haven’t done any aftermarket audio in a long time, not because factory systems are great, but until now they’ve been good enough. Given my slight indifference toward factory systems in my other vehicles (probably fortunate unfamiliarity with true high end aftermarket systems like are done here), I thought maybe a small amplifier in the Giulia could be sufficient to give the sound some life.

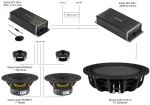
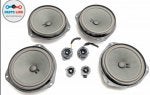
Like most other new vehicles, the Giulia has an integrated headunit (ETM), impractical to replace. The ETM in 2017 is the same hardware as the BMW - NBT Evo ID5/6, but doesn’t have optical out. In its BMW persona, it can be coded for lower level differential output, but as Giulia forums member Unique discovered, coding the premium Harmon Kardon (HK) mode via ODB causes loss of volume and fader control, because it’s is done via CAN bus on the HK system amplifier, needing something unavailable like the iDatalink Maestro. The Giulia also presents other integration difficulties with load detection requirements, auto start/stop and rumored electrical system sensitivity. The speakers are common to other Fiat and Alfa Romeo vehicles and not very high quality. There is a claimed 1” tweeter in the dash, and 6.5” woofers in the front doors. The same speakers are in the rear doors. The HK system has upgraded components and 3” mids in the front doors, dash and rear deck, along with a 6x9 IB subwoofer.

Base Speakers


I didn’t find many amplifiers explicitly listing auto start/stop compatibility: Audiotec Fischer Match/Helix and Kicker KEYs. I’m sure there are more and maybe I over thought it, but some manufactures (ahem Kenwood) won’t even answer the compatibility question. The Kicker KEY 180.4 seemed like a good candidate, inexpensive with Auto EQ DSP that might help the factory speakers sound better. My original plan was to install the KEY 180.4 in the dash near the ETM, but after opening the silencer panel under the steering wheel I discovered no space to install. So I started to rethink how, then what I wanted to do. The more I researched and found details of the components of the system, the more I wanted to replace them. This rekindled my forgotten car audio hobby and what I’ve been missing.

I decided to do a whole system, but didn’t want to spend a lot of money. I stuck with the stock locations, but given the capabilities of the KEY 180.4 I already had, decided to go active for the many benefits. This allowed replacing only the front speakers since, as previously stated, the rear tweeter locations bleed and completely ruin the imaging. The remaining system components were chosen around that decision; considering fit, function and reasonable cost. Raw component speakers ended up the best candidates, helping keep cost down. The following sections detail choices made and how they were installed.


System Diagram
 

Attachments

#2 ·
ETM

The ETM uses a 40pin Fakra plug, so to avoid cutting factory wires I purchased a 40pin Fakra adapter. The front speaker wires in the adapter were cut and run to the trunk down the driver side along the factory bundle. Woofer channels run back to the adapter, using the factory wiring for the woofers. New wires for tweeter channels were run along driver and passenger tunnels and easily up into the dash. 16ga TXL automotive wire was less than speaker wire, came in multiple colors for identification and was flexible enough.

 
#3 · (Edited)
Amplifiers

Kicker KEY 180.4 - 45W x 4 at 4 ohms
Kicker KEY 500.1 - 300W at 2 ohms

As previously mentioned, the KEYs have factory integration features for ease of install:
  • High level inputs - Negates the need for a LOC.
  • Load resistor - The KEY 180.4 specifies either 60 or 68 ohms (have seen both numbers, not sure which is correct).
  • DSP - The KEY 180.4 can run tweeters and woofers active with time alignment and Auto EQ. The KEY 500.1 can fix bass roll off.
  • Tiny!
I had already bought the KEY 180.4. The KEY 500.1 at 2 ohms matched well with the subwoofer I ultimately chose and the power it was rated for. I wanted to run at 2 ohms anyway to reduce current load on the battery and electrical system.

I considered installing in the stock HK amplifier location which is the rear quarter panel behind the trunk liner, but was unable to determine how much space was available without removing the trim panels. Being behind trim panels isn’t accessible for adjustments either. Many others have installed in a storage box that contains the fuse box. It’s under the cargo cover/floor, but I didn’t favor occupying that space either. I have a Ti model without the Performance Package, thus the modules for the adjustable suspension and LSD aren’t present, so their location under the cargo cover/floor was the perfect place since there are stock bolts to secure them. Amp boards were constructed with 1/4” baltic birch plywood after some PVC proved difficult to obtain. The amplifiers sit just in front of the subwoofer box. I constructed some foam spacers that go below a small floor/cargo cover, covering the amps. The foam prevents subwoofer box movement and gives the amplifiers more air space.

KnuKonceptz provided power and fusing. 4ga wire (remnant I had from a build long ago) was attached to a spare terminal in the battery fuse terminal with a right angle lug and run along a factory run on the passenger wheel well and out by the rear fuse box to a distribution block. The 80A fuse is attached to the frame above the battery with two screws. The distribution block splits to a 20A fuse with 8ga wire to the KEY180.4 and 60A fuse with 8ga wire to the KEY 500.1. Ground is run to the factory provided bolt for the aforementioned missing modules.

 
#4 · (Edited)
Front Tweeters

Through research of what others used, I knew not much would fit. Most remove the inner factory cage and glue the aftermarket tweeter in. I found the raw Dayton Audio ND25FN-4 1” silk dome had perfect dimensions (41mm) to fit inside the factory cage. It’s specs looked good, with an Fs of 1350Hz, it should be plenty capable of playing down to the 3200Hz 24dB LR crossover point. Reviews for same tweeter in different form factors were positive.

Small sections of the plastic on the outer tabs were trimmed to line up with the three retaining clips on the factory cage. After insertion, the waveguide on the cage came down touching between the dome and surround. I used a rotary tool to trim the waveguide just below the little circle to provide a mm or two space. Gasketing tape was attached around the top of the cage to direct the sound out and keep the dome away from the grill.

50uF (995Hz) protection capacitors were wired inline near the amplifier since there was more space.

 
#5 · (Edited)
Front Woofers

Since the tweeter and subwoofer chosen were Dayton Audio, it was easiest to get everything from Parts Express. I decided on the RS180P-4 for the doors given it’s specifications and good reviews. The frequency response graph shows it start to dip about 3000Hz on axis, near the 3200Hz 24dB LR crossover point. It’s not on axis though and 30 degrees natural -6dB point is around 3300Hz. I’m hopeful the KEY EQ will handle it.

These aren’t installed them yet. I’m loathe to remove the door panels and be out of service for a while again. I have to make adapters/spacers to fit them, so need to figure out the depth and find a source for the material. Since they are 180.5 mm wide, I’m hoping they fit without modification. I’m hoping to make some kind of rain guard also.

Installing deadener involves detaching the window and motor to remove the access panel, which I am weary to do. The factory installs some deadener above and inside the crash bar, so I might just do what I can without removing the access panel. I can already feel the stock woofer vibrating the door and hear the door handle rattling though. The notorious door card rattle is also present.

Update:

I finally got the RS180Ps in the doors.

Removal

There are great instructions available for removing the door cards and I don’t have anything to add. As others noted, it’s neigh impossible to remove them without breaking clips. Since Alfa makes getting parts without going to a local dealer inexplicably difficult, I bought some clips for Jeep Renegade/Compass that are identical except color. I also broke a reflector light despite being gentle, so be extra careful there.

Deadening

Deadening is complicated because of the aforementioned internal panel with the window and regulator/guide attached, but I wanted to try and do as much as possible. Started with the passenger door first, but my Torx bits were too short to release the window. I was in get it done mode, so I relented and decided to skip removing the panel and get pieces of deadener as large as possible in as deep through the speaker hole. It’s pretty difficult to get large pieces in there. I had second thoughts before doing the drivers door, so I bought longer Torx bits, loosened the window and pulled/taped it up, and attempted to remove the inner panel. I wasn’t certain after reading the Italian forum, but it really is necessary to remove the door handle and latch as it wouldn’t come off in the rear. I didn’t want to do all that, so relented again. Having the inner panel loose did allow getting the deadener into the door in much larger sheets though, so it’s worth doing.

I didn’t want to deal with any chance of butyl melting and I’d seen the 3M EDM1029 deadener, so I decided to try it. It was slightly more than Dynamat Extreme for 2 Sqft less, but they claim equal performance with less. Since I anticipated not removing the inner panel, it seemed worth the difference. The EDM1029 is really easy to cut and apply and really light. I have no deadener experience but it seems to work via the very non scientific knuckle test.

I applied some deadener to the door card also and used Tesa tape/CCF on anything I thought might rattle. Thinsulate SM200L was used as decoupler and attached with velcro to the door panel. I couldn’t find a similar source of CCF for any less. Both the EDM1029 and SM200L seem like great products to me. The rattling in the door card is gone.

Woofer Install

The RS180P is 180.5mm wide, larger than the stock speaker and the opening in the door card, so it had to mount behind the door card or cut the door card. I decided not to cut the door card, but I wanted to get as close as possible. Using the stock woofer as a template, I crafted a spacer using scrap plywood. I decided it was too thin for the RS180P, so made it bigger before transferring it to Expanded PVC at 195mm diameter 12mm deep. They were cut by hand so they’re not pretty, but they work fine and aren’t visible. The bottom lip of the inner panel had to be cut some for the speaker magnet to fit. Since the RS180P is a paper cone, a foam speaker protector was cut in half and installed over the top of the cone to protect from water dripping. Adapters were used to connect with factory wiring.

I got lucky, everything just fit perfectly! The woofer comes right up to the Thinsulate on the door card, and there is just enough room for the window to clear the cover over the magnet. I’d cut another ring out of 3mm expanded PVC thinking I’d need both, but after adding gasket tape (CCF) and Thinsulate decoupler, it wasn’t needed.

In case anyone needs measurements, 64mm deep from the inner panel face to the window glass. The stock speaker depth varies: 20mm at the top and 23 mm the bottom. If you are using a standard 6.5” woofer, you can use a deeper spacer and come out into the door card opening to get closer to the grill.

 
#6 · (Edited)
Subwoofer

The Giulia has no spare and there isn’t a lot of space for a subwoofer. I didn’t want to lose lots of volume and functionality to a subwoofer box. I dreamed up replacing the cargo/floor cover and possibly the foam, making a new pseudo false floor. This plan would require using a shallow subwoofer. The cargo cover/floor measured 32.5” x 26.5” easily available before it narrows. Using the maximum space and available power from the KEY 500.1, WinISD simulated an assortment of candidates: Dayton Audio LS12-44, Dayton Audio RSS265HO (for reference to a non shallow), JL Audio 12TW3-D4, Oncore SM12 D4, SB Acoustics SW26DBAC76, Sundown SD-4 12, and Stereo Integrity BM MK V.


The Dayton Audio LS12-44 fit quite well in the available space in a box measuring 32.46” x 24.46” x 3.96”, with a volume of 1.205 cu ft. A smidge smaller than recommended, but not much. It matched the available 300W at 2 ohms and modeled well compared to other (often more expensive) options.

The box was made out of 1/2” Baltic Birch with internal window bracing. Glued only, with silicone in the corners to seal joints. It’s as shallow as possible, the backplate of the subwoofer nearly touches the box. Heavily stuffed with polyfill to get Qtc down around .707. Total weight with the subwoofer is around 34.2 lb.

A grill from Parts Express fit well but required inverting the mounting ring and some spacers. I left about 1/2 in carpet trim on the sides, just like the factory cargo cover/floor, so it blends in.

The box sits on top of the factory foam block and comes up a bit above the rear sill where it breaks at an angle. It isn’t quite as integrated of a false floor as I’d imagined, but it’s clean and retains most of the trunk functionality. Removing the foam and saves about another half inch, but it sits at an angle.

 
#7 · (Edited)
Setup

Giuliaforums user @ztodd377 reported clipping at volume 30, so I used 29 to set the gain. Volume 29 with an 80Hz 0db sine wave measured 8.3V across the load resistor with a DMM. 8.3V^2 = 68.89 / 39.1 Ohm = 1.76W. The STI amplifier in the ETM specs around 0.01-0.015 distortion, so hopefully a clean signal.

KEY 180.4
The KEY 180.4 uses a microphone to set time delay, crossover and auto EQ. When run in bi-amp mode with tweeters, it uses a 3200Hz 24dB LR crossover point , which I do wish was adjustable. I currently have the KEY 180.4 gains near minimum.

Settings:
  • Auto Turn-On: DC
  • Fader: OFF
  • Compression: ON
  • BI-AMP Mode: ON
  • Kicker EQ: Disabled
  • Time Delay: Enabled
  • Hi-Pass Filter: 80Hz
  • Radio Detect: On/In
Kicker EQ was unclear, so I asked and the reply was:

The EQ curve was tuned by ear by the design engineer. We don’t have a chart of the EQ curve, however here were the changes he made;
Cut -3dB @ 110Hz BW 0.8
Cut -3dB @ 338Hz BW 0.8
Cut -5dB @ 570Hz BW 0.8

Boost 1dB @ 5kHz BW 0.8
Boost 5dB @ 8.2kHz BW 0.8
Boost 4dB @ 13.1kHz BW 0.8


Those are wide filters which boost treble a lot. They may be to compensate for factory speakers, but it doesn’t seem to fit what I’d want, so it’s disabled.

KEY 500.1
The KEY 500.1 negates bass roll off, using a sweep tone to calculate what I assume is a shelf filter. I learned the hard way to disable the KEY 180.4 before it runs. It gets loud! I don’t hear any difference in the bass output with the Key setting enabled or disabled, coinciding with the belief the ETM doesn’t have bass roll off. I left it enabled. The gain is set to clipping at volume 29. There was so little bass with the 0dB track, I emailed Kicker thinking something was wrong. I ended up using the -10dB track with much better results.

Settings:
  • Key: Enabled
  • Hi-Pass: 10Hz (min)
  • Low-Pass: ~80Hz
  • Bass Boost: 0dB
  • DC Offset: OFF - The KEY 180.4 provides turn on.
  • Input Level: HI
 
#8 · (Edited)
Results

I’m still tinkering and not quite done since I need to install the front woofers and try to better set each component at the appropriate level, but so far I’m pretty happy. Overall, it sounds much much better.

Both KEYs stay on during auto start/stop events. The maximum volume is not deafening, but it’s loud enough at 29. The KEY 180.4 time delay fixed the imaging and the crossover raises the sound stage mostly above the dash. The EQ appears to have smoothed some peaks out also.

The Dayton ND25FN tweeters sound way better than stock. Smooth and sparkly, not harsh and tiring. They image nicely.

The stock woofers sound better than before, but are now easily overpowered and sound like they easily hit their excursion limits exhibiting compression and distortion. I imagine the RS180Ps will be better.

The subwoofer sounds good and plays deep. I expected more output from my first 12”, but I realize it’s a shallow subwoofer with similar output to a good 10” and not driven with high power. The rear seat back is solid and I guess attenuates 2-3dB, with the pass through down there is quite a bit more output. Maybe I need to try removing plastic cover over the stock 6x9 subwoofer hole in the rear deck. It’s such a small hole, so I don’t imagine it would make much difference for bass waves.

I measured with an iPhone RTA, which I know isn’t accurate, but provides an idea what’s going on. There was a big null around 65-70Hz in the driver seat. Swapping the subwoofer phase helped remove the null. It sounds better, but now the bass is slightly more locatable to the rear.

Even with the 80Hz 24dB LR high pass crossover, the door panel buzzes badly. Hopefully it can be resolved when I install the RS180Ps and some deadener. The trunk doesn’t rattle much, I think the subwoofer is isolated by sitting atop the foam block. I also have a silicone license plate frame to keep rattling down.