Greetings all! I finished this build a couple of weeks ago in my 2023 Chevy Bolt EV. The stock system (non-Bose) was...okay, but bad enough that even my wife starting cracking wise about how bad it sounded. That aggression could not be allowed to stand, so off I went.
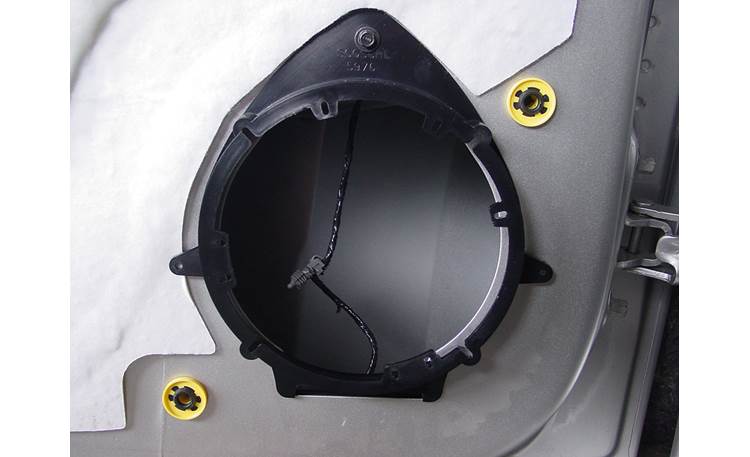
I started by selecting my front component set - the Bolt EV can accommodate 6.5" woofers in the doors, and there are factory tweeters up in the corners of the dashboard, right under the windshield. After checking out a few local shops only one had speakers set up I could demo, and from those I thought the Audison Voce series sounded the best. I was intrigued by other brands too, but have been out of the "game" for a long time and wasn't really familiar with stuff like Hertz, Focal, Memphis, and so on. So while I would have loved to test-listen to a wider variety of options, the Audison were the only ones I really liked that I could hear, and I wasn't interested in jumping in to a set I couldn't audition first.
As luck would have it, my local classifieds came through for me - Audison Voce component set new in-box. Then I found the matching coaxial set for sale on here (thanks @Rferrara1!).
Next up I needed an amplifier, and again lucked out locally - someone had an Audison AP8.9 bit, the matching AP1 D subwoofer amplifier, and the ABPX 10DS sealed-box subwoofer for sale as a package. I remain somewhat interested in trying out different amplifiers, as the AP8.9 is a little weak in terms of RMS wattage and the DSP software is old. But for now it seems to be working quite well in an active configuration, with bridged channels feeding the front woofers and the remaining four channels connected to the front tweeters and rear coaxials. (Though as of this writing I've only set the amp's crossovers; have not yet messed with tuning as I'm still waiting on a microphone delivery.)
I decided pretty early on to use the "spare tire" well for the amplifiers. I put that in quotes because the Bolt EV does not include a tire in the well - it was full of a mostly-empty styrofoam insert, large enough to fill the well but the only tool in it is a threaded hook for towing from the bumper hard point. Huge, ridiculous waste of space if you ask me. In other countries GM is good enough to at least put a 12v tire inflator in this styrofoam insert, but mostly I didn't find the thing all that useful. Easy removal since a single hand-threaded bolt held the whole insert in, so out it came.
I considered having a subwoofer built into that space, but in the end I wanted this to be a minimal-investment, maximum-DIY job. And it's quite important for me to be able to revert to stock quickly and easily, so I decided against any significant custom-fabrication or other work.
That led me to the first significant hurdle - getting a signal back to the amplifier(s), and then getting the amp'd signal back up and out to the doors.
At this point I pay tribute to those who came before me, and did this by separately isolating the wiring running out to each door near each door jam, and cutting in to the wires at those locations. Very dedicated work from those individuals, as it was also very difficult. When I first started researching this project that approach was all I could find documentation on, and while I honor those who did this project that hard way, I was not willing to go that route.
Thankfully there is a shortcut that allowed me to harvest the speaker-level signals and then send the amplified signal back out to the doors without carving in to any stock wiring and without needing to pull trim near the doors to find the right wires. Just above the passenger footwell, on the right side behind the glove box, is a silver box. I think this box is an all-in-one that houses the radio tuners (AM, FM, and satellite), bluetooth and WiFi modules, and is probably the stock amplifier as well. Coming out of this box are, among other things, two wiring harnesses, one black and one grey. This comports with some other GM setups, and I found a wiring diagram that seemed to match the pin arrangement and insulation colors:
![Image]()
![Image]()
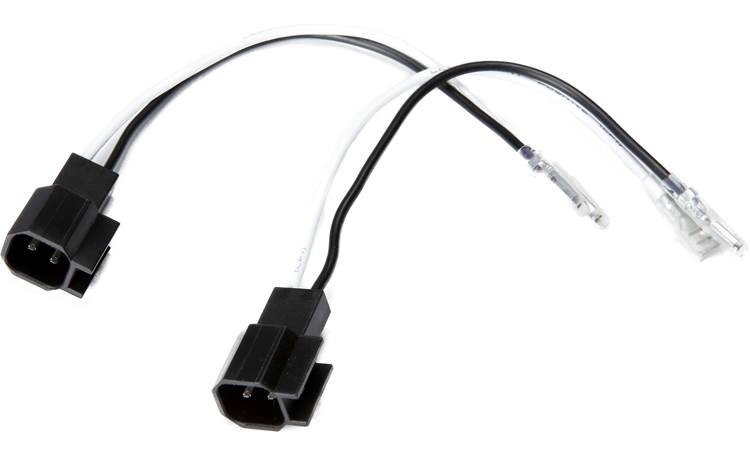
So I set out to find a harness that could sit in-line between the silver box and the black and grey harnesses once they were unplugged. Several vendors make such a "breakout" harness already, but they were either out of stock or crazy expensive, or both. Instead, I settled on this:
Marketed as an extension harness, but the connectors match and the length of it would give me plenty of slack to work with. Once the Axxess harness arrived I tested it by unplugging the two stock connectors from the silver box (they have a little locking tab that needs to slide out first) and inserting the Axxess harness in-line, and voila! Full functionality. After a few hiccups, that is, mostly related to a couple of the pins in the Axxess harness being bent. But after I got everything settled properly I knew I could make use of the harness, since everything stock still worked.
So I took the harness inside, cut and pulled the corresponding speaker wiring out of the wire wrapping near each end (the Axxess has labeled the wiring for you, and it does correspond to the wiring diagram posted above, so that made it easy!), and attached my signal and return wires:
![Image]()
This image shows the signal wires, for which I used some of this: Crutchfield CSW9W-20
![Image]()
For the return wires, I knew I would need six channels (for the tweeters too) so I found a wire with twelve conductors inside the sheath. This photo shows the eight for the wiring destined for the doors wired back in to the harness, with the remaining four (two channels, one for each tweeter) still hanging loose. This is the product I used: 16/12 SOOW Portable Power Cable 600V UL CSA
With the signal and return wires connected in to the Axxess harness, I went back out to the Bolt, tied the signal and return ends together accordingly, and plugged the Axxess harness back in again. And, again, voila! All stock functionality remained. This proved to me my harness modifications were correct. Yay!
See next post for Phase 2.
I started by selecting my front component set - the Bolt EV can accommodate 6.5" woofers in the doors, and there are factory tweeters up in the corners of the dashboard, right under the windshield. After checking out a few local shops only one had speakers set up I could demo, and from those I thought the Audison Voce series sounded the best. I was intrigued by other brands too, but have been out of the "game" for a long time and wasn't really familiar with stuff like Hertz, Focal, Memphis, and so on. So while I would have loved to test-listen to a wider variety of options, the Audison were the only ones I really liked that I could hear, and I wasn't interested in jumping in to a set I couldn't audition first.
As luck would have it, my local classifieds came through for me - Audison Voce component set new in-box. Then I found the matching coaxial set for sale on here (thanks @Rferrara1!).
Next up I needed an amplifier, and again lucked out locally - someone had an Audison AP8.9 bit, the matching AP1 D subwoofer amplifier, and the ABPX 10DS sealed-box subwoofer for sale as a package. I remain somewhat interested in trying out different amplifiers, as the AP8.9 is a little weak in terms of RMS wattage and the DSP software is old. But for now it seems to be working quite well in an active configuration, with bridged channels feeding the front woofers and the remaining four channels connected to the front tweeters and rear coaxials. (Though as of this writing I've only set the amp's crossovers; have not yet messed with tuning as I'm still waiting on a microphone delivery.)
I decided pretty early on to use the "spare tire" well for the amplifiers. I put that in quotes because the Bolt EV does not include a tire in the well - it was full of a mostly-empty styrofoam insert, large enough to fill the well but the only tool in it is a threaded hook for towing from the bumper hard point. Huge, ridiculous waste of space if you ask me. In other countries GM is good enough to at least put a 12v tire inflator in this styrofoam insert, but mostly I didn't find the thing all that useful. Easy removal since a single hand-threaded bolt held the whole insert in, so out it came.
I considered having a subwoofer built into that space, but in the end I wanted this to be a minimal-investment, maximum-DIY job. And it's quite important for me to be able to revert to stock quickly and easily, so I decided against any significant custom-fabrication or other work.
That led me to the first significant hurdle - getting a signal back to the amplifier(s), and then getting the amp'd signal back up and out to the doors.
At this point I pay tribute to those who came before me, and did this by separately isolating the wiring running out to each door near each door jam, and cutting in to the wires at those locations. Very dedicated work from those individuals, as it was also very difficult. When I first started researching this project that approach was all I could find documentation on, and while I honor those who did this project that hard way, I was not willing to go that route.
Thankfully there is a shortcut that allowed me to harvest the speaker-level signals and then send the amplified signal back out to the doors without carving in to any stock wiring and without needing to pull trim near the doors to find the right wires. Just above the passenger footwell, on the right side behind the glove box, is a silver box. I think this box is an all-in-one that houses the radio tuners (AM, FM, and satellite), bluetooth and WiFi modules, and is probably the stock amplifier as well. Coming out of this box are, among other things, two wiring harnesses, one black and one grey. This comports with some other GM setups, and I found a wiring diagram that seemed to match the pin arrangement and insulation colors:
So I set out to find a harness that could sit in-line between the silver box and the black and grey harnesses once they were unplugged. Several vendors make such a "breakout" harness already, but they were either out of stock or crazy expensive, or both. Instead, I settled on this:
Marketed as an extension harness, but the connectors match and the length of it would give me plenty of slack to work with. Once the Axxess harness arrived I tested it by unplugging the two stock connectors from the silver box (they have a little locking tab that needs to slide out first) and inserting the Axxess harness in-line, and voila! Full functionality. After a few hiccups, that is, mostly related to a couple of the pins in the Axxess harness being bent. But after I got everything settled properly I knew I could make use of the harness, since everything stock still worked.
So I took the harness inside, cut and pulled the corresponding speaker wiring out of the wire wrapping near each end (the Axxess has labeled the wiring for you, and it does correspond to the wiring diagram posted above, so that made it easy!), and attached my signal and return wires:
This image shows the signal wires, for which I used some of this: Crutchfield CSW9W-20
For the return wires, I knew I would need six channels (for the tweeters too) so I found a wire with twelve conductors inside the sheath. This photo shows the eight for the wiring destined for the doors wired back in to the harness, with the remaining four (two channels, one for each tweeter) still hanging loose. This is the product I used: 16/12 SOOW Portable Power Cable 600V UL CSA
With the signal and return wires connected in to the Axxess harness, I went back out to the Bolt, tied the signal and return ends together accordingly, and plugged the Axxess harness back in again. And, again, voila! All stock functionality remained. This proved to me my harness modifications were correct. Yay!
See next post for Phase 2.