DIYMobileAudio.com Car Stereo Forum banner

The Stereo Integrity 2006 Audi A4 Avant IB-24 Stealth Install

58K views 260 replies 49 participants last post by  hparker  
#1 · (Edited)
I'm going to preface this thread with the fact that I'm NOT a shop.

I don't run a business, I'm just lucky enough to have enough garage/shop space at my house that will allow me to build/house my own cars and work on cars for friends.

The cars I get are typically cars that are the big projects that sit in the back of a regular car audio shop and collect dust. I have one that was shipped down from PA because the owner had spent so much time and money on the vehicle only to be disappointed in both the sound and quality of work. He knows I have a high level of attention to detail and won't let anything leave that I'm not happy with.

Other times I'll have people contact me to do things that they've been told can't be done.

When we first moved to the place (a couple of years ago this past March) I had a guy that wanted to have a vehicle delivered here. Told him to wait because I needed to get the wood shop built.

He didn't wait. lol I ended up going through his build while trying to make progress on the wood shop. Then the Audi showed up.

So before I go too far...

First few pics are of "the shop". This is the first floor of the house.

That's the front door on the right. The glass door goes upstairs to the living area.

305334


From the front door you see the 3-car bay.
305336


From the back corner of the 3-car bay looking toward the front door. you can also see the 2-car bay with the yellow-ish lighting in the distance. The area on the left of the image is where I planned to put the wood shop. In this state the place was a 7-car garage.
305338


The garage sink, some cabinets, and a 1/2 bath is down here. The walkway to the left of the sink/cabinet area was originally a doorway. The current 2-car bay was a carport when the house was built. The open wall on the left was an exterior wall when the carport was open.
305339


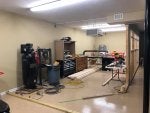
This is a shot standing inside what I planned to be the wood shop and looking out into the rest of the garage.
305340


Looking from the front of the 2-car bay towards the long, open wall and the space behind it where the wood shop would go.
305341


Getting tools situated and started work framing the new walls.
305343


305344


I decided to go larger than my original plan and 45 one corner of the shop. That gave me the ability to put a large double door opening in. Thanks to COVID the doors and windows I want are out of stock.
305347


So I'm re-uploading images that disappeared and now it'll only allow 10 images.

There's a full shop build album here. It's still a work in progress.

So anyway, that's a quick rundown of "the shop". I had two cars brought here before I could get fully set up. The Audi is the first "big" project. That's the focus of this thread.

I call it Batdog Garage because my service dog is a German Shepherd the Batdog nickname stuck.

Audi info incoming...
 

Attachments

#2 · (Edited)
Now...the Audi.

I first met Nick at the Sundown show in North Carolina. I had to drive down from Northern VA to compete at the Sundown show for the VA State Finals. I was competing with my '66 Chevelle that ran Stevens CompNeo mini horns, Stevens MB8-2s, and a pair of DD Audio 3015 ESPs in a 4th order blow-through in the rear deck.

Nick saw the car and introduced himself. "Hey, I'm Nick. From Stereo Integrity"

I was like "Cool" and kind of left it at that. I really didn't know anything about SI other than what I'd read here on DIYMA.

So that was pretty much our interaction. Just a "Hey" at the show and we moved on.

Fast forward to my wife and I moving to GA and getting the new place. Since we had the space to have a good-sized get-together I invited everyone here for BBQ and a meet. Also got a MECA judge to attend so guys could get points.

Nick asked if he could bring some stuff to display and I was like "sure".

So Nick is here, sees the big van project I have here, and we went over the equipment list that was in the monstrosity. He told me he has subs (HST-15s) that would walk all over the 13W7s that were in the build. I looked at them online, told him I didn't believe they're SQ subs, and would have to get hands-on before I could recommend/suggest new subs to the van owner.

A short time later I had my laptop and my SysTune rack loaded up and went to Nick's place to tune his Passat. Had issues with his Zapco processor and didn't get to do the full tune but he loved it.

I came back with a HST-15 to mess with.

Everything he told me about the HST-15 was true. Holy crap, what a sub.

A short time later he asked if I'd be interested in building his Audi.

Nick's plan was to run the SQL-15 in a 2ft^3 sealed enclosure in the spare tire well. Hidden, under the floor. Since the previous owner had cut openings for some 3-inchers in the kicks we discussed running a full 3-way setup in the front.

At the time Sundown's SALT monoblock amps were hitting the market but what people didn't know is that they were also working on multichannel amplifiers. I was given three Sundown SALT multichannels to power the car.

So...here's the guinea pig.

2006 Audi A4 Avant. Getting a full stealth build.

305349


The first step of the build was to drill out all of the spot welds that held the hump in the spare tire well in place. On the underside of that hump was the EVAP canister for the fuel system. Had to remove that as well and think about a future home for it.

It was at this point that I knew I couldn't just put a SQL-15 sealed in the car. It HAD to get an IB-24.

305350


And the IB-24 that's going in. You can also see in this image how the floor looked from the previous install. Ian had a suitcase sub in the car.
305351


Making a template for the subwoofer baffle.
305352


This template provided me with the OD and ID of the 24" basket. Put that in place to better lay out exact sub location. Flush trim bit and I have a better idea of how things are looking.
305353


Went to a local metal shop to get stuff cut on the CNC plasma from 3/16" steel plate. They made the sub cutout on the CNC plasma and the rest was cut on the shear so I could get exact fit at the house with my plasma cutter.
305355


Hand cutting the final perimeter shape of the baffle with the plasma. Mandatory safety sandals on.
305354


Upper baffle and lower ring dry-fit in place.
305356


A lot of you have seen this image. Insanity.
305359
 

Attachments

#4 ·
Thanks for the awesome post, it was very cool the way you stepped thru everything!

Keep it coming...
 
#5 · (Edited)
As much as Nick was hesitant to use a Helix, I convinced him it was the way to go.

One of the things I wanted to do to keep the stealth install was to hide the Director. I decided to put it in the factory ash tray/coin holder/whatever that sits under the HVAC controls.

I sent the Director housing through the table saw and cut it down to the point that there was just the face of it left with the chamfers at the top and bottom. Then the circuit board was reattached and I started the modification process of the Audi's ashtray/coin holder/lighter socket/whatever. The recesses on either side of the unit were filled in and I created an angled pocket for the Director to sit that would allow it to be seen from the driver's seat and allow the lid to open/close without issue. This is a LARGE controller to fit in here. Took quite a bit of work to make happen.

305360


305361

To make tuning easy I installed a mini-USB plug on the right side of the Director. Here's an initial shot with the dry-fit plastic filler panel with the plug dry fit.
305362


Progress.
305363


305364


305365
 
#6 · (Edited)
A shot I took for those that were worried about how much the IB-24 would hang down under the car. The mufflers are lower than the motor. I will be adding some layers of protection for the sub, but no big deal as far as clearance is concerned.

305366


305367


305368


The two main goals with this install was to keep everything stealth and keep it all serviceable. I welded nuts to the bottom of the baffle with the sub bolted in place to ensure that all of the nuts were located exactly where they needed to be and there was no chance of one being ever so slightly off if I had tried placing them without the sub bolted in place.
305369


The baffle was then welded to the car. I can't remember, but I believe this was after the first pass. Took forever to get this welded in. We made three passes on the top side and three on the bottom side. It was imperative to me that we had continuous metal and didn't have to go back with body filler to smooth things. This led to social media welding inspectors bitching about the welds being "bird **** welds with no penetration" without understanding that we were intentionally welding some passes with intent to knock it back down to have a smooth, continuous metal surface.
305370


I got curious and bolted the sub to the baffle and powered it up. The sub was getting between 60 and 72 Watts (measured in real-time using the AMM-1's live power feature) and was shaking the house.

The cabin vents in the back corners of the car posed a problem. When playing infrasonic frequencies they'd flap like mad.
305371
 
#8 · (Edited)
A buddy of mine, Sumo, is a boilermaker. Spends his days welding heavy wall pipe. He came to do welding in the back of the car.

It took a minute or ten for him to get over the silliness of what we were going to be doing.

This is his "Ooh, this is going to be fun" face. 😂

This image also shows the metal ring/flange for the bottom compared to the size of the opening from removing the hump in the spare tire well.
305372


When your subwoofer cutout houses a large Samoan...
305373


Had to remove a couple of odd bits from the bottom of the spare tire tub. The recovery point (long area removed on the right) was also removed to allow me to build things the way I wanted.
305374


Getting the flange welded in. Tacked it in a few places then re-worked the bottom of the spare tire well to re-shape it to blend into that lower 3/16 flange the way I wanted. Lots of work with an air saw and hammer/dolly to get it perfect.
305376


Bottom view with it tacked in. You can also see filler panels in place where we cut out the factory recovery point and another piece that had to go.
305375


Remember those cabin vents that made noise? We cut some filler pieces on the plasma. This piece of scrap was tacked to the filler panel to serve as a handle while we tacked the filler panel in place.
305377


With this handle I could hold the piece in place while Sumo tacked a few spots around the perimeter to lock it in place.
305378
 
#9 · (Edited)
Here you can see the filler panel for the passenger rear welded in place. The copper color is SEM's Copperweld - a weld-through primer. I wanted to prime all of the parts that I was installing to keep any possibility of rust at bay.
305379


Driver's side cabin vent block-off plate installed.
305380


Between my inability to focus and my OCD, I decided that something had to be done with the exhaust tips on this thing.
305381


305382


The new Director housing was prepped for flocking then flocked.
End result. The top was treated with SEM's texture coat then SEM satin black prior to applying the flocking.

305384


Got to this point and decided that it needed to be redone. Didn't like the finish at the transition between the flock and the rest of the surface. Little things that bug me. Can also see the USB connection for the Director here.
305383
 
#10 · (Edited)
Stupid Sonic Barrier. Never, ever use this stuff. It melts. It stuck to my jeans when I sat in the cargo area of the car.

WD-40, a putty knife, and a nylon mesh pad removed it.
305385


Start of internal construction of the spare tire well. There's 3/4" square tube around the spare tire well at eight locations that span the distance between the upper 3/16" baffle and lower 3/16" ring/flange where the protective material for the sub will be installed. These 3/4" square tubes create an I or H beam structure that reinforces everything and will eliminate flex in the baffle.

Ram board was used to make templates between each of the square tube supports then transferred to steel. Had the metal shop roll the steel for us. I gave them a diameter for the top, a diameter for the bottom, and a height and they rolled a tapered cylinder to fit the car. As a whole unit the cylinder didn't fit, but once we cut pieces from it that were sized to our templates, they all fit perfect.

Notice the nuts on the bottom were welded to that 3/16" steel ring. Again if, by any chance, an issue comes up where a nut has to be replaced, the nuts are on the inside of the wall we're building and easily accessible. Can be cut out and new ones welded in.
305386


305387


This shot shows where we blocked off an area to install a SMD terminal cup. This was blocked off to keep foam out and give us an area to run cable from the cabin area to the back of the terminal cup.
305388


At this point we could do the big foam pour.

We filled the void between the wall we created and the walls of the factory spare tire well with a 2-part urethane expanding foam from US Composites with a density of 16lbs per cubic foot.

Since we were working blind during the foam pour and couldn't see exactly where the foam was traveling, I broke out the thermal imager so I could see progress as the foam expanded in the void.
305389


The holes that were drilled in the baffle for the foam pour were then plug welded shut. Also notice the 3/16" plate welded in for the SMD terminal cup. Still have some final touch-up welding and smoothing to do in that spare tire well in this image. You can also see heat-affected areas (discoloration in the Copperweld) where the inner wall was welded to the baffle. Good penetration, good, solid welds.
305390
 
#18 ·
My gosh who would ever have thought Ian’s old car would be at this level audio wise. I love the fact that it’s been allowed to keep going on, as opposed to just sitting in a corner of a shop somewhere.
Yup, one of the reasons I was so happy Nick bought it. From talking to him many times I knew he'd take care of it, the install it's getting is icing on the cake.
 
#15 · (Edited)
That's one of those things that I've heard reactions go both ways. Some say "It's going to be an issue when you close the doors. They're going to be harder to close."

Saw another person say that they knew someone that blocked the vents and the pressure busted a window when they closed the door. Probably knew someone that blew out their windshield with Kicker 10s, too. 😂

Have had people say the same as you - that it's detrimental to the HVAC system due to not having an exit.

Have had others say that they blocked their vents and the HVAC system functions just fine.

Before we welded these shut I asked Nick if he wanted to remove the flaps or block them off and we discussed all of the things that could happen.

We decided to block them off because of front wave/back wave isolation.
 
#20 · (Edited)
So the busted glass thing CAN happen. Interesting. I seriously equated it to the old "Yeah man, blew my windshield out with them there Kickers." 😂

I think shutting the doors will be fine. That enormous sub cone will move enough anyway to accommodate the pressure hit on closing the door!

The airflow issue will be very much dependant on how well the car is sealed - and worst case, you will have to crack the windows to get good airflow. The other thing that could be an issue is differential pressure across the sub. Under the floor at the rear will be a relatively low pressure area, in fast moving air and near the back. Without the vents, the cabin will be pressurised from the high pressure air coming in at the front. This will push the sub down, and the force may be quite significant given the vast surface area.
The Audi will slightly lower the window glass when opening/closing the doors. Once the door is closed the window slides back up and seals.

Ultimately the decision came down to speaker performance and getting front wave/back wave isolation by sealing off those vent locations made the decision for us.

Yup, one of the reasons I was so happy Nick bought it. From talking to him many times I knew he'd take care of it, the install it's getting is icing on the cake.
Ian, I'm sure you've seen the videos on YouTube. I'm pointing out some things that I've found (wiring, use of Sonic Barrier that melts) during my time with the car. Please don't take any of the things I point out personally.

Running cable between the factory connector and sheet metal happens a lot. I pointed out that it was done in this car, problems that it can cause, and how the average guy at home can run extra wire pairs through the connector in a factory manner.

Nick DID say you warned about him about the door wiring. 😂 I didn't get that warning, but more of a choose-your-own-adventure storyline as I went through them. 😂

So I'm not trying to talk down on the previous work at all, just using it as an educational moment to show people that there's a better way. Kind of like the responses that I've been getting on the sound treatment videos where everyone wishes they had seen my videos before they treated their doors.
 
#17 ·
I think shutting the doors will be fine. That enormous sub cone will move enough anyway to accommodate the pressure hit on closing the door!

The airflow issue will be very much dependant on how well the car is sealed - and worst case, you will have to crack the windows to get good airflow. The other thing that could be an issue is differential pressure across the sub. Under the floor at the rear will be a relatively low pressure area, in fast moving air and near the back. Without the vents, the cabin will be pressurised from the high pressure air coming in at the front. This will push the sub down, and the force may be quite significant given the vast surface area.
 
#21 · (Edited)
No worries, I've enjoyed the videos. It's neat seeing the DIY vs Pro type of things as well, the door treatment was especially interesting to watch.

I felt bad for you with the Sonic Barrier! It was recommended to me and I couldn't believe it when I noticed some melting. Thankfully, Parts Express refunded me fully (I think I'm still the only negative review on the site)

JI808 said:
Have a link for Ian's old build thread here? Would be interesting to look at.
I'm try to find it, I half heartedly kept one running!
 
#22 · (Edited)
No worries, I've enjoyed the videos. It's neat seeing the DIY vs Pro type of things as well, the door treatment was especially interesting to watch.

I felt bad for you with the Sonic Barrier! It was recommended to me and I couldn't believe it when I noticed some melting. Thankfully, Parts Express refunded me fully (I think I'm still the only negative review on the site)
Dude...the reviews of Sonic Barrier on the PE website were overwhelmingly negative months back when I encountered that mess. Last time I looked they had purged some of the negative reviews.

Nick didn't want me to mess with the Sonic Barrier. "Just leave it" 😂

As much as I didn't want to mess with it, removing it was the right thing to do because better door treatment will make the car sound better.

My goal is to show the "DIY guys" how to get Pro level results for things that they may think are complicated - like re-pinning door connectors.
 
#23 ·
 
#25 · (Edited)
I hadn't seen that thread. Definitely a funny read that I think we can all relate to. We've all been there at some point.

It also explains some of the things I've found while gutting and reworking the car. I'm sure Ian's skillset has improved since he started that adventure.

Ian, here's how the kicks look now. In my rebuild of the car every interior piece is getting cleaned or re-upholstered as it goes back into the car. I deep cleaned the carpet twice before putting it back in the car. It will get a 3rd cleaning before delivery.

Quick discussion on the kick panels...

The uncleaned driver side kick vs the clean passenger side kick. It's crazy to see how much dirt accumulates on surfaces over the years. This is, after all, a 2006 model.
305400


I spent time re-working the grilles for the kicks. Minor things to make them fit nicer and look better. The images here and the work I did will be in an upcoming video.

The "stock" kick panel with the grilles Ian had.
Image


The cleaned kick and re-worked grille. The grille is a tighter fit to the kick panel and a little grille cloth makes it blend in so much nicer with the rest of the interior than the grille mesh.
305401
 
#41 · (Edited)
Dude. I'd kill for a shop that nice!

Sweet install so far. If it was a Bimmer, I'd shame you for cutting holes, though. 🤣
I'm ex-military. Wife is still in. So I guess technically...:oops:

Nice work, can't wait to see the rest. What is the plan for power supply side? H.O. Alternator, batteries, caps?
I'd you find an HO alternator for the Audi/VW 2.0t let me know, I've looked and couldn't find one. Think they're 140amp alternators to begin with.
Have an XS Power battery for it and a 390A alternator from JS Alternators.

Should be plenty of supply side power for the car.

The new tweeters do look better. Is the grill easily removable?

One thing I don't see the logic of using on any tweeter are push spring terminals?

Especially if the goal was to significantly decrease the overall size & depth to allow them to fit in more space-constrained locations?

It seems like the overall depth & diameter of the rear chamber could have been reduced even further while maintaining the same chamber volume if the push-spring terminals were deleted.

And IMO, push-spring terminals are a waste on any driver. The only thing they really offer is a convenience factor, along with a higher price tag.

I don't know about others, but I don't think most of us plan to swap our drivers in & out very often. So the convenience factor of push-spring terminals becomes somewhat of a moot point.

And you don't see push-spring terminals being used even on the best and most expensive large format high-end tweeters, such as Dynaudio's Esotar2 110, Scanspeak Illuminators, Morel Supremo Piccolo v2 or Elate Atlas, or Focal Utopia TBM, etc.

I'm really glad that Nick decided not to use them on the small M3 Carbon mids. So I was a bit surprised to see them on the new tweeter, especially since you've indicated that the primary goal was a compact form factor.

Anyhow...

Fantastic work!

It looks like both a fun and frustrating install, haha. It's tough when the equipment keeps changing mid-install which forces you to chase a constantly moving target.

Hopefully it looks as if that part of it is finally settled and you can get to the meat & potatoes of the install. Otherwise Nick may never get his car back. :p

And I somewhat agree on your disdain for A-pillar mids & tweeters. Tumor-like A-pillar pods really distract me both while listening and while driving. It really depends on the specific vehicle, the installer's design, and the form factor of the drivers on whether or not the mids & tweeters can be implemented with a low-profile, non-obstructive stealth look in A-pillars. I've seen some that were very thoughtfully designed and that really blend in nicley with an OEM look. But again, your at the mercy of what the vehicle allows.

One thing that A-pillars and sometimes Sail Panels can offer (if designed properly) is getting the midrange and tweeter's center-to-center spacing as close as possible and also in a vertical orientation, and preferably on the same baffle or mounting plane.

Whether in home or car systems, having the midrange and tweeter vertically oriented and with the proper center-to-center spacing (usually quite close) in relation to the intended crossover frequency ALWAYS results in sharper focus and better imaging & soundstage, especially in terms of Depth & Layering.

This has also been my and others experience in regards to using concentric midrange & tweeter drivers such as the KEF UniQ and BMS 5CN162HE. They always seem to bring the special sauce when it comes to soundstage image depth & layering. IME, it's nearly impossible to achieve this same level of 3D soundstaging when the mids & tweeters are separated by any significant distance, and/or are not oriented on a vertical axis to minimize lobing.

Just my .02 as I see the kickpanels are currently designed just to house the lonely midrange drivers and am assuming the tweeters will go in the OEM upper door locations some distance away.

Thanks for sharing your progress and fabrication/installation techniques!
Tweeter grilles. I haven't tried to remove them and have no need to do so. They're literally the only two in the country.

The push terminals. They don't bother me. They're far more robust than spade terminals and there would have been zero difference in mounting depth between push terminals and spades.

I saw development images/CAD drawings of these before these test units I have in hand were made. I asked Nick to make a run of raw drivers (without the the aluminum housings, mounting ring, grille) so I could have just the raw driver for the install and he said that they would have a different frequency response than built units. The reason is that the rear chamber you're talking about is actually a tuned chamber.

I'm not going to pretend to be a speaker engineer/manufacturer so I can't say this way is better than that, but fact is that Nick's measurements come from Klippel testing.

So if he says there's a reason for that chamber being there, I'm not going to argue with him. 😂

Here's an image of a production run of housings with that chamber visible. Maybe Nick will come in with a better/more in-depth explanation.
305402


Now...back to install discussion and stealth installs.

I've had people tell me (adamantly, I might add) that THE KICK IS A HORRIBLE PLACE FOR A MID. IT'S NEVER GOING TO SOUND GOOD. IT WON'T SOUND NATURAL. YOU'LL NEVER MAKE IT SOUND RIGHT. FEMALE VOCALS WILL SUFFER

I'm over here like "Challenge accepted. I guess we'll just be stuck listening to male vocals." 😂

Here's what people are overlooking with this car - and one of the main reasons I wanted to do (was adamant about doing) a complete stealth install. It really comes down to something I call visual listening. People that let their eyes influence what they're hearing.

Too often people get into a car and make assumptions about how the car is going to sound before the first bit of information is played.

I've heard:

"Oh, it's an Audiofrog car."

"It's in your face." That person blamed the "in your face" thing on the tweets being in the sails. It was a 2015 Camaro the tweets were in the factory location. Often times people see speaker placement and let that influence their sense of depth a car has.

I had a judge get out of my Chevelle and I asked him how he liked it. "Not as bad as I expected" He said he typically doesn't like horn cars (I'm running Stevens CompNeo minis and Stevens MB8-2s) but mine was better than he expected. So it was good to hear that it was better than he expected, but a bit frustrating that he'd made an assumption before ever listing to the first track. I get it, though. There have been a lot of bad horn cars over the years.

Here's a good visual listening story: Had a guy tell me that he was running his mid/tweet in the kicks. Judge told him that the car sounded good, but the stage was low. If he'd put his tweets in the sails or A-pillars the stage would be higher. So he went to the junkyard, got some A-pillars, put tweets in them, and never hooked them up. That same judge got in the car after the pillar swap and said that the stage was nice and high now - the way it should be...even though they were still listening to the same tune being played by the same drivers mounted in the same kicks. Of course he never told the judge what he had done. 😂

Gerald Costa's bread truck is another great example. The first time I saw it I didn't know what to think. Speakers all over. 10" (or were they 12"?) midbasses on the ceiling, even. Looking at it I was torn between thinking it was built by someone that knew a little about audio but didn't really know how to install, or "this guys knows something I f'n don't and I'm about to to get schooled in this thing." I saw speakers, but couldn't ID the drivers. In my head I was thinking "this is going to go one of two ways; It's going to sound bad/weird as it looks or it's going to blow me away"

So you know what I did? I closed my eyes and listened. I LOVE that bread truck. One of my favorites. It's an unconventional install, but it's a great vehicle to listen to. Gerald, if you're seeing this, high five

I've had installers, shop owners, and other guys online comment about specific brands. I built a Toyota in Hawaii that was running all Focal components, a JL 13TW5, and he used a Rockford 3Sixty.3 for a processor. I got a comment about "Why ruin all of that nice gear by using a 3Sixty.3?" Told the guy to send the processor he felt the owner should be using and I'd install it. Fact is not a single person reading this is going to be able to get in that vehicle and ID what processor is in it by listening.

And that's a challenge I've thrown out several times. "This is the best sounding amp I've ever heard. It's so much better than X."

Told the guy I'd build a complete system in a car and if he could get in, do blind listening, and correctly identify a single component by brand/model he could have the entire system. He didn't take me up on the offer.

I've been offering that challenge for years. Have yet to have someone take me up on it.

There are many more examples, and we've all seen this happen. People make assumptions about a vehicle based on what they see in the car. Not a fan of a specific brand? You're likely going to find more negatives about that car than one that's running gear that you like.

So again...stealth installs.

I prefer stealth installs over the flashy, in-your-face stuff that looks good in pictures. With a stealth install you have the advantage of added security, you typically keep all of the factory cargo space and vehicle function, but another benefit is that it forces people to do blind listening.

Anyone that gets in the car sees factory (or what appears to be factory) speaker grilles. The only thing in this car anyone will see that will stand out as not being factory is the head unit.

So let's talk about speaker locations and the way the car will be set up. Ian previously modified the kicks for a midrange driver. I don't know how well it worked out for him, but since the kicks were already modified I wanted to make use of them. Specifically because I knew the new M3 Carbons were on the way and I have this whole "visual listening" thing that I know people do (whether they admit it or not) that want to put to a test.

I'll be able to run this car with the front set up three different ways:

1. 2-way with midbass and tweeter in doors
2. 2-way with midbass in door and wideband (M3 Carbon) in the kick
3. 3-way with midbass in door, M3 Carbon used as a midrange in the kick, and then the tweeter in the door

So let's look at option 1:
There's a factory tweeter and midbass location in the doors. They're X distance apart. Let's say the crossover between the two drivers is 2,500Hz. Tons of people run a similiar setup in their cars and it's never discussed as being an issue. That midbass is playing up to 2,500. No one ever complains about separation (distance) between midbass and tweeter.

Now, Option 2:
Running the Midbass in the door up to say...300 or 400Hz and then let the M3 Carbon handle everything from that point up. Shouldn't be a huge issue/debate here. Guys have ran midbass/tweet combos in kicks for years and performed well with them. The big question is how well will these M3 Carbons function as a wideband driver in the kick? We're going to find out. I bet they kick ass and surprise a lot of people.

Now, option 3:
This is the one that has stirred up the most conversation/controversy. Midbass in the door, M3 Carbon as a midrange in the kick, and tweeter in the door. So let's say we run the midbass up to 300 or 400Hz. From there the M3 Carbon takes over and handles everything up to 2,500Hz. At that point the M25 takes over at 2,500Hz. The discussion is that the M3 Carbon (midrange) is too far apart from the tweeter and that's a problem.

But...

Look at the below image again and think back to Option 1. All frequencies below 2,500Hz are coming from the midbass that is X distance from the tweeter. In Option 1 the handoff is between midbass and tweeter at 2,500Hz. In Option 3 the handoff is still at 2,500Hz but it's now between the M3 Carbon (midrange) and tweeter. Same crossover freq, essentially the same distance apart as the midbass/tweeter combo in Option 1. We can argue theory until we're blue in the face and angry at one another, but IS it going to make a difference that people will hear? We're going to find out.

The beauty of this car (and Ian putting those locations in the kicks) is that we have the opportunity to take Nick's tweets, Nick's M3 Carbons, and his TM65s and run them in a variety of combinations in an installation that looks factory. When you get in you won't know what combo you're listening to. I think it's the ideal build for a car that will showcase Stereo Integrity's gear. The full line-up of components will be installed and with a change of tune on the processor you can listen to any combination you'd like. Oh, and there's that big honkin' 24 in the back. With that we get to show how accurate/fast/musical/clean/transparent big subs can be.

I mean...what better scenario could you have for a factory demo vehicle?

And it's all because Ian put some stupid midrange locations in the kicks. Dangit, Ian! 😂
 
#38 · (Edited)
The new tweeters do look better. Is the grill easily removable?

One thing I don't see the logic of using on any tweeter are push spring terminals?

Especially if the goal was to significantly decrease the overall size & depth to allow them to fit in more space-constrained locations?

It seems like the overall depth & diameter of the rear chamber could have been reduced even further while maintaining the same chamber volume if the push-spring terminals were deleted.

And IMO, push-spring terminals are a waste on any driver. The only thing they really offer is a convenience factor, along with a higher price tag.

I don't know about others, but I don't think most of us plan to swap our drivers in & out very often. So the convenience factor of push-spring terminals becomes somewhat of a moot point.

And you don't see push-spring terminals being used even on the best and most expensive large format high-end tweeters, such as Dynaudio's Esotar2 110, Scanspeak Illuminators, Morel Supremo Piccolo v2 or Elate Atlas, or Focal Utopia TBM, etc.

I'm really glad that Nick decided not to use them on the small M3 Carbon mids. So I was a bit surprised to see them on the new tweeter, especially since you've indicated that the primary goal was a compact form factor.

Anyhow...

Fantastic work!

It looks like both a fun and frustrating install, haha. It's tough when the equipment keeps changing mid-install which forces you to chase a constantly moving target.

Hopefully it looks as if that part of it is finally settled and you can get to the meat & potatoes of the install. Otherwise Nick may never get his car back. :p

And I somewhat agree on your disdain for A-pillar mids & tweeters. Tumor-like A-pillar pods really distract me both while listening and while driving. It really depends on the specific vehicle, the installer's design, and the form factor of the drivers on whether or not the mids & tweeters can be implemented with a low-profile, non-obstructive stealth look in A-pillars. I've seen some that were very thoughtfully designed and that really blend in nicley with an OEM look. But again, your at the mercy of what the vehicle allows.

One thing that A-pillars and sometimes Sail Panels can offer (if designed properly) is getting the midrange and tweeter's center-to-center spacing as close as possible and also in a vertical orientation, and preferably on the same baffle or mounting plane.

Whether in home or car systems, having the midrange and tweeter vertically oriented and with the proper center-to-center spacing (usually quite close) in relation to the intended crossover frequency ALWAYS results in sharper focus and better imaging & soundstage, especially in terms of Depth & Layering.

This has also been my and others experience in regards to using concentric midrange & tweeter drivers such as the KEF UniQ and BMS 5CN162HE. They always seem to bring the special sauce when it comes to soundstage image depth & layering. IME, it's nearly impossible to achieve this same level of 3D soundstaging when the mids & tweeters are separated by any significant distance, and/or are not oriented on a vertical axis to minimize lobing.

Just my .02 as I see the kickpanels are currently designed just to house the lonely midrange drivers and am assuming the tweeters will go in the OEM upper door locations some distance away.

Thanks for sharing your progress and fabrication/installation techniques!